
![['Close-up shot of colorful Witch Hat Cupcakes with chocolate frosting and wafer cones.', 'Side view of Witch Hat Cupcakes, showcasing rich chocolate toppings and decorative cones.', 'Detail image of witch hat themed cupcakes, featuring a dark chocolate exterior and frosting.', 'Close-up of whimsical Witch Hat Cupcakes with creamy buttercream and chocolate cone tips.']](https://tastykuche.com/wp-content/uploads/2026/07/witch-hat-cupcakes_1_U1.webp "Enchanting Witch Hat Cupcakes for a Spooktacular Treat")
Delight in Creating Enchanting Witch Hat Cupcakes This Halloween
As the leaves turn and the nights grow longer, Halloween beckons us to indulge in a bit of magic—and what better way to celebrate than with **Enchanting Witch Hat Cupcakes**? These whimsical treats not only captivate the eye but also tantalize the taste buds with their rich chocolate flavor and creamy frosting. In this guide, we’ll explore everything you need to know to make these delightful cupcakes, ensuring your Halloween festivities are both fun and delicious. From ingredient breakdowns to expert tips, let’s dive in!
Why You’ll Love This Recipe
Making Witch Hat Cupcakes is not just about satisfying your sweet tooth; it’s about creating cherished moments. Here are five reasons why this recipe is a must-try:
- Fun for All Ages: Kids and adults alike will enjoy the creative process of decorating these cupcakes, making them a perfect family activity.
- Visual Appeal: The eye-catching design of witch hats makes these cupcakes a standout at any Halloween gathering.
- Simple Ingredients: With readily available ingredients, you can whip these up without a hassle, even if you’re short on time.
- Customizable: Feel free to experiment with flavors and decorations to make your cupcakes uniquely yours.
- Perfect for Sharing: These treats are great for parties, school events, or simply to enjoy at home, inviting everyone to indulge in a little Halloween magic.
Ingredients Breakdown with Substitutions
Creating these cupcakes is straightforward, but understanding each ingredient can elevate your baking game. Here’s what you’ll need:

★ Recommended Kitchen Tool
Cake Decorating Set
Make this recipe even easier with a quality Cake Decorating Set — a must-have kitchen staple!
- Flour: All-purpose flour works best; for a gluten-free option, substitute with a gluten-free flour blend.
- Cocoa Powder: Unsweetened cocoa powder gives a rich flavor; you can use Dutch-processed cocoa for a milder taste.
- Baking Powder: This leavening agent helps your cupcakes rise; ensure it’s fresh for the best results.
- Sugar: Granulated sugar sweetens the batter; you can reduce it or use coconut sugar for a healthier alternative.
- Eggs: These bind the ingredients; for a vegan version, flax eggs or applesauce can be used.
- Unsalted Butter: Adds richness; substitute with vegetable oil or vegan butter if desired.
- Buttercream Frosting: A classic topping; consider cream cheese frosting for an added tang.
- Wafer Cone: Forms the hat; chocolate cones can add a fun twist.
Step-by-Step Instructions to Make Witch Hat Cupcakes
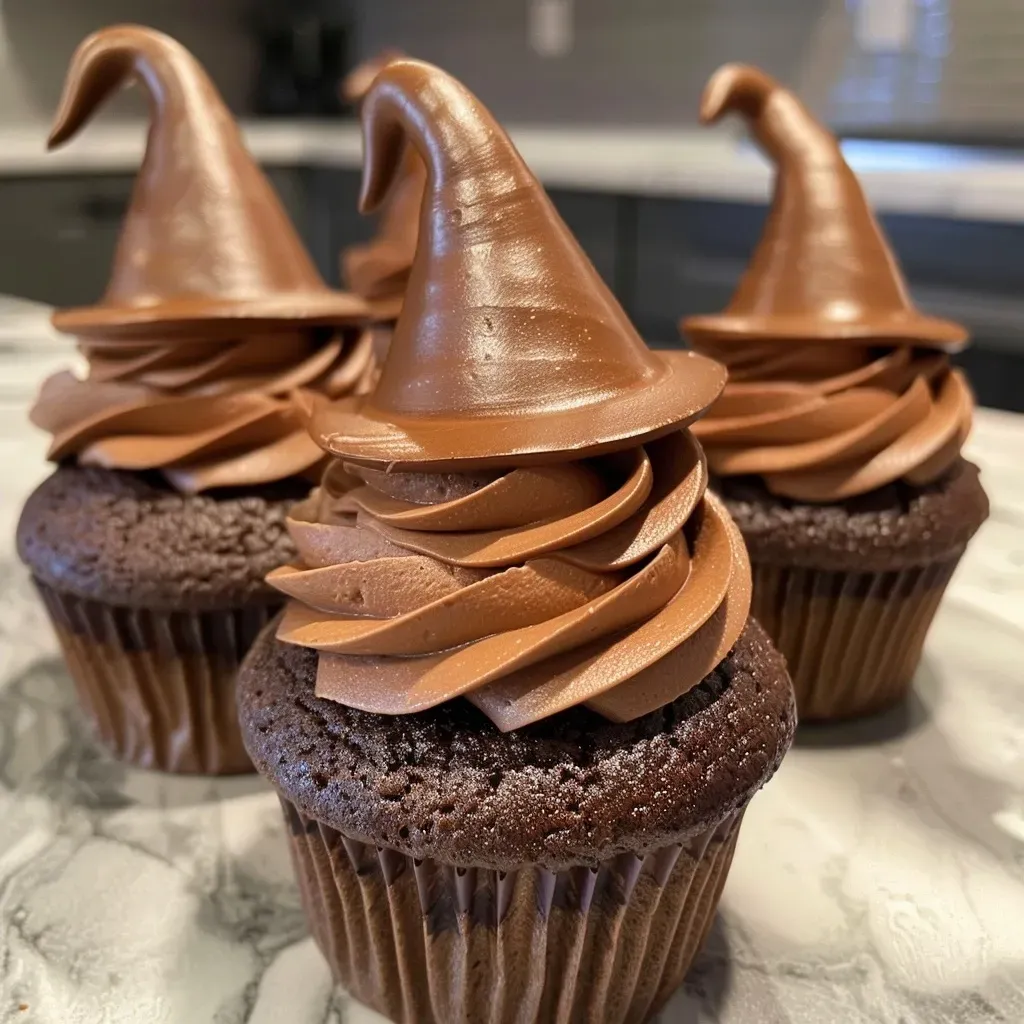
Follow these simple steps to create your own enchanting witch hats:
- Preheat your oven to 350°F (175°C) and line a muffin tin with cupcake liners.
- In a large bowl, combine flour, cocoa powder, baking powder, and sugar, whisking until blended.
- In another bowl, beat together eggs, melted butter, and vanilla extract until smooth.
- Gradually add the wet ingredients to the dry mixture, stirring until just combined.
- Divide the batter evenly among the cupcake liners, filling each about two-thirds full.
- Bake for 18-20 minutes or until a toothpick inserted into the center comes out clean.
- Let the cupcakes cool completely on a wire rack.
- Once cooled, frost each cupcake with a generous layer of buttercream frosting, smoothing it out with a spatula.
- Attach a wafer for the brim and place a cone on top to form the witch’s hat.
Expert Tips for Perfect Witch Hat Cupcakes
To ensure your cupcakes turn out perfect every time, keep these expert tips in mind:
- Room Temperature Ingredients: Make sure your eggs and butter are at room temperature for a smoother batter.
- Don’t Overmix: Mix until ingredients are just combined to keep your cupcakes light and fluffy.
- Use a Parchment Liner: This helps release the cupcakes easily and prevents sticking.
- Visual Impact: Use food coloring to tint the frosting for a more festive look; consider purple or green shades.
- Chill the Frosting: If your buttercream is too soft, chill it briefly before frosting for better control.
- Decorate Ahead: Prepare the cupcakes in advance and frost them just before serving for optimal freshness.
- Layering for Flavor: Consider adding a layer of ganache or jam between the cupcake and frosting for a surprise burst of flavor.
- Use Edible Glitter: Sprinkle some edible glitter on top for an enchanting touch!
Common Mistakes and Troubleshooting
Even the best bakers can encounter hiccups. Here’s how to troubleshoot:
- Dry Cupcakes: This can happen if you overbake. Always check for doneness a few minutes early.
- Frosting Melting: If your frosting melts, it may be too warm. Chill before frosting.
- Flat Cupcakes: Ensure your baking powder is fresh and not expired to achieve the right rise.
- Too Sweet: If the frosting is too sweet for your taste, add a pinch of salt to balance the flavors.
Variations to Explore
Don’t hesitate to get creative! Here are some fun variations to try:
- Spooky Spider Cupcakes: Use chocolate spiders as decoration instead of cones.
- Ghostly Witch Hats: Top with white frosting and use chocolate chips for eyes.
- Pumpkin Spice Cupcakes: Substitute some cocoa with pumpkin spice for a seasonal twist.
- Chocolate Mint Hats: Add mint extract to the frosting for a refreshing flavor.
Storage and Make-Ahead Instructions
Want to prepare these treats in advance? Here’s how to store them:
- Room Temperature: Store unfrosted cupcakes in an airtight container for up to 3 days.
- Frosted Cupcakes: Keep in the fridge for up to 5 days; allow them to come to room temperature before serving.
- Freezing: Freeze unfrosted cupcakes for up to 3 months. Thaw overnight in the fridge before frosting.
Frequently Asked Questions
Here are answers to some common queries:
- Can I use a different frosting? Absolutely! Feel free to use cream cheese or whipped cream frosting.
- How can I make these cupcakes healthier? Consider using whole wheat flour and reducing sugar for a healthier option.
- What’s the best way to decorate? Use piping bags for a professional look or simply spread the frosting with a spatula.
- Can I add fillings? Yes! A surprise filling of raspberry jam or chocolate ganache adds a delightful twist.
- Are these cupcakes suitable for vegan diets? Yes, with egg and butter substitutes, these can be made vegan.
- How do I make chocolate ganache? Heat equal parts cream and chocolate chips until melted, then let cool before using.
- What if I don’t have cocoa powder? You can replace it with additional flour or try a different flavor, like vanilla.
- How can I adjust for high altitude? You may need to adjust the baking powder and sugar; consider researching high-altitude baking tips.
Nutrition Tips and Dietary Adaptations
For those mindful of their dietary needs, consider these adaptations:
- Gluten-Free: Use gluten-free flour blends and ensure all other ingredients are gluten-free.
- Dairy-Free: Substitute butter with coconut oil and use dairy-free milk options.
- Low Sugar: Reduce sugar or use natural sweeteners like honey or agave.
- Nut-Free: Ensure all ingredients are nut-free if allergies are a concern.
Equipment Recommendations
To achieve the best results, here’s a list of essential equipment:
- Muffin Tin: A standard 12-cup muffin tin is perfect for baking your cupcakes.
- Mixing Bowls: Use a set of mixing bowls for combining ingredients easily.
- Whisk: A whisk is essential for mixing dry and wet ingredients thoroughly.
- Piping Bags: For a professional touch when frosting your cupcakes.
- Cooling Rack: Allows your cupcakes to cool evenly, preventing sogginess.
Serving Suggestions
Ready to impress your guests? Here’s how to serve your Witch Hat Cupcakes:
- Plate Presentation: Arrange them on a festive platter with Halloween-themed decorations.
- Pair with Drinks: Consider serving with spooky punch or hot apple cider.
- Offer Variety: Include other Halloween-themed treats alongside for a delightful dessert table.
Conclusion
With their whimsical design and delicious flavor, **Enchanting Witch Hat Cupcakes** are sure to be a hit at your Halloween celebrations. Whether you’re baking with family or preparing for a party, this recipe is a delightful way to embrace the spirit of the season. Remember to experiment and have fun in the kitchen, allowing your creativity to shine through. Happy baking and enjoy the spooky season!
Witch Hat Cupcakes
Ingredients
Baking ingredients
- 1.5 cups flour
- 0.5 cups cocoa powder
- 1.5 teaspoons baking powder
- 1 cups sugar
- 3 eggs eggs
- 0.75 cups unsalted butter
- 1 cup buttercream (for frosting)
- 1 wafer wafer (for the brim)
- 1 cone cone (for the tip)
Instructions
-
Prepare a chocolate cupcake using flour, cocoa powder, baking powder, sugar, eggs, and unsalted butter.
-
Once cooled, apply a smooth layer of tinted buttercream on each cupcake.
-
Attach a wafer for the brim and a cone for the tip to create the witch hat shape.

![['Close-up view of Apple Cinnamon Cookie Energy Bites, showcasing their chewy texture and bits of apple.', 'Side view of homemade Apple Cinnamon Cookie Energy Bites with visible oats and cinnamon.', 'Detailed shot of energy bites featuring grated apple and a sprinkle of cinnamon.', 'Close-up image of golden-brown Apple Cinnamon Cookie Energy Bites, highlighting their delicious ingredients.']](https://tastykuche.com/wp-content/uploads/2026/07/apple-cinnamon-cookie-energy-bites_1_U1-150x150.webp)
![['Close-up of Slow Cooker Sweet and Sour Chicken featuring colorful bell peppers and pineapple chunks.', 'Juicy pieces of chicken in a sweet and sour sauce, garnished with vibrant veggies.', 'Side view of a bowl of Slow Cooker Sweet and Sour Chicken showcasing the dish’s rich colors and ingredients.', 'A hearty serving of Slow Cooker Sweet and Sour Chicken with chunks of chicken, pineapple, and bell peppers.']](https://tastykuche.com/wp-content/uploads/2026/07/slow-cooker-sweet-and-sour-chicken_1_U1-150x150.webp)