
![['A close-up view of Halloween-themed spider cupcakes with Oreo decorations and candy eyes.', 'Side view of two spider cupcakes topped with black buttercream and Oreo cookie details.', 'Juicy, decorated cupcakes resembling spiders, featuring crushed Oreos and candy eyes.', 'Close-up of cupcakes with a spooky Halloween theme, showcasing an Oreo spider design.']](https://tastykuche.com/wp-content/uploads/2026/07/spider-cupcakes_1_U1.webp "Spooky Sweet Spider Cupcakes for a Hauntingly Fun Treat")
Unleash Your Creativity with Spooky Sweet Spider Cupcakes
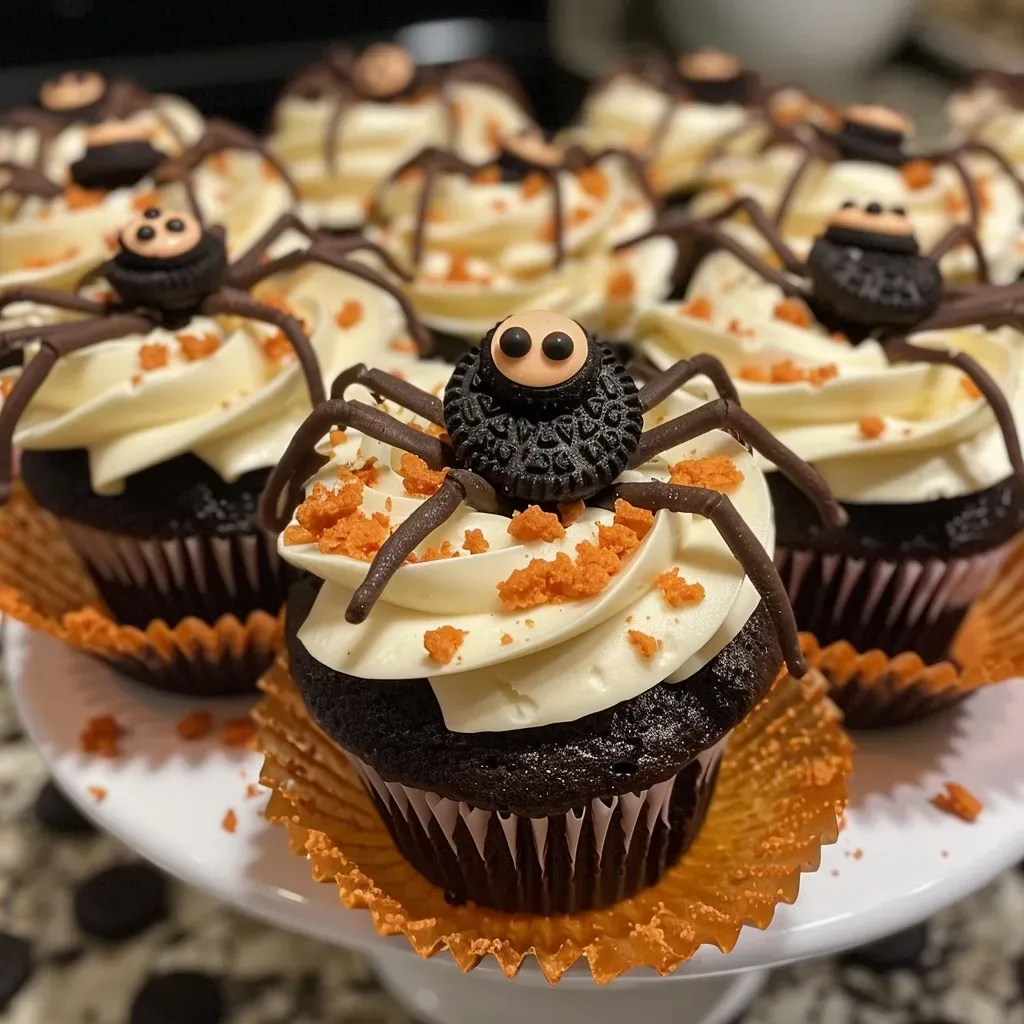
As the leaves turn and a crisp chill fills the air, it’s time to embrace the spirit of Halloween with a delightful and spooky treat: Spider Cupcakes. These spider cupcakes are not only a feast for the eyes but also a joy to make, allowing you to create a festive atmosphere while enjoying the process of baking. Using simple ingredients like white cake mix and Halloween Oreos, you’ll discover how to craft these charming desserts that will impress both kids and adults alike. In this guide, we’ll take you through each step, ensuring your spider cupcakes are a hit at any celebration.
Why You’ll Love This Recipe
This recipe isn’t just about aesthetics; it’s packed with benefits that make it a must-try:
- Simple Ingredients: With just a handful of everyday ingredients, including crushed Oreos and buttercream frosting, you can whip up a batch in no time.
- Fun for All Ages: Making spider cupcakes is a fun activity that the whole family can enjoy, from mixing the batter to decorating the finished product.
- Customizable Designs: Feel free to let your creativity shine—experiment with different colors of frosting and candy decorations.
- Perfect for Parties: These spooky treats are ideal for Halloween parties, school events, or just a cozy night in with friends.
- Deliciously Delectable: The combination of fluffy cake and creamy frosting, coupled with the crunch of Oreos, makes every bite a delightful experience.
Ingredients Breakdown
Here’s everything you will need to create your spider cupcakes:

★ Recommended Kitchen Tool
5-Speed Electric Hand Mixer
Make this recipe even easier with a quality 5-Speed Electric Hand Mixer — a must-have kitchen staple!
- 1 box white cake mix: This serves as the base of your cupcakes. You can opt for a homemade vanilla cake recipe for a more personalized touch.
- 2-3 packages of Oreos: Halloween-themed Oreos work beautifully for this recipe, but regular Oreos are just as tasty.
- 2-3 cups crushed Oreos: This will be folded into your frosting for added texture and flavor.
- Candy eyes: These are essential for creating the spooky spider effect. Get creative with your placement!
- Buttercream frosting: Use store-bought or make your own for a richer flavor. This will serve as both the frosting and the “glue” for your decorations.
- Edible glue (optional): If you’re having trouble getting your candy eyes to stick, a little edible glue can help.
Step-by-Step Instructions
Follow these easy steps to make your spider cupcakes:
- Prepare the white cake mix according to the instructions on the box. Add about 1/2 to 1 cup of finely crushed Oreos to the batter for a delicious twist.
- Pour the batter into cupcake liners and bake as directed, usually around 18-20 minutes at 350°F (175°C). Allow them to cool completely.
- While the cupcakes are cooling, prepare your buttercream frosting. Once ready, fold in about 1 and 1/2 cups of crushed Oreos to give it a delightful crunch.
- Pipe your buttercream onto the cooled cupcakes using a piping bag and a recommended tip (Ateco 860 works well).
- Place an Oreo on top of each cupcake to create the spider body. Then pipe the legs using black tinted buttercream with a small round tip.
- Finally, use edible glue to secure the candy eyeballs onto the Oreo, creating your spooky spider’s face.
Pro Tips for Success
Here are some expert insights to ensure your spider cupcakes turn out perfectly:
- Use Room Temperature Ingredients: For the best texture, ensure your eggs and butter are at room temperature before mixing.
- Don’t Overmix: When combining your cake batter, mix until just combined to avoid dense cupcakes.
- Cool Completely: Make sure your cupcakes are fully cooled before frosting to prevent melting.
- Experiment with Flavors: Try chocolate or red velvet cake mix for a fun spin on the classic recipe.
- Color Your Frosting: Adding food coloring to your frosting can enhance the Halloween theme—think orange, purple, or green!
- Practice Piping: If you’re new to piping, practice on parchment paper before frosting your cupcakes.
- Use Quality Ingredients: Higher quality butter and chocolate can elevate the overall flavor of your cupcakes.
- Store Properly: Keep your cupcakes in an airtight container at room temperature to maintain freshness.
Common Mistakes and Troubleshooting
Even the best bakers can make mistakes. Here are some common pitfalls and how to avoid them:
- Cupcakes Doming: If your cupcakes dome too much, reduce the baking time slightly and check for doneness a few minutes early.
- Dry Cupcakes: Avoid overbaking. Keep an eye on your cupcakes as they approach the end of the baking time.
- Frosting Melting: If your frosting is melting, the cupcakes may be too warm or the room temperature too hot—try chilling them briefly before decorating.
- Candy Eyes Falling Off: If they don’t stick, use a little extra frosting or edible glue to secure them better.
Creative Variations
Want to switch things up? Here are some fun variations to try:
- Chocolate Spider Cupcakes: Use chocolate cake mix and dark chocolate frosting for a richer flavor.
- Gluten-Free Option: Substitute the cake mix with a gluten-free alternative and ensure all other ingredients are gluten-free.
- Vegan Spider Cupcakes: Replace eggs with flax eggs and use a plant-based cake mix and frosting.
- Spider Web Design: Instead of legs, use a piping bag to create a spider web effect on top of the cupcakes.
Storage and Make-Ahead Instructions
If you’re planning ahead, here’s how to store your spider cupcakes:
- Room Temperature: Store in an airtight container for up to 3 days at room temperature.
- Refrigeration: For longer storage, keep them in the fridge for up to a week. Bring to room temperature before serving.
- Make-Ahead: You can bake the cupcakes in advance and freeze them. Just thaw and frost on the day you plan to serve.
Frequently Asked Questions
Here are answers to some common questions about making spider cupcakes:
- Can I use a different cake mix? Absolutely! Feel free to use vanilla, chocolate, or even red velvet cake mixes.
- Do I have to use Oreos? While Oreos are recommended for their flavor and appearance, any chocolate cookie can work in a pinch.
- Can I make these cupcakes ahead of time? Yes, you can bake them a few days in advance and frost them when you’re ready to serve.
- How long do these cupcakes last? They can be stored at room temperature for up to 3 days or in the refrigerator for up to a week.
- What can I use instead of candy eyes? Chocolate chips or small candies can be used as an alternative if you can’t find candy eyes.
- Can I use homemade frosting? Yes! Homemade buttercream is fantastic and allows for more flavor customization.
- What size piping tip should I use? A small round piping tip (like a #3 or #4) works best for creating the spider legs.
- Is it necessary to add crushed Oreos to the frosting? While it adds flavor and texture, you can skip it if you prefer plain frosting.
Nutrition Tips and Dietary Adaptations
If you’re looking to make your spider cupcakes a bit healthier, consider these tips:
- Reduce Sugar: Cut down on the sugar in your frosting or use a sugar substitute.
- Whole Grain Flour: Substitute part of the cake mix with whole grain flour for extra fiber.
- Natural Sweeteners: Use honey or maple syrup in place of refined sugar in your frosting.
- Portion Control: Bake mini cupcakes for a smaller treat that’s perfect for parties.
Equipment Recommendations
To achieve the best results, here’s a list of equipment that can be helpful:
- Mixing Bowls: A set of mixing bowls in various sizes will help with ingredient prep.
- Piping Bags and Tips: Essential for decorating your cupcakes beautifully.
- Measuring Cups and Spoons: Ensure accurate measurements for perfect results.
- Oven Thermometer: This ensures your oven is at the correct temperature for baking.
- Cooling Rack: Allow your cupcakes to cool evenly after baking.
Serving Suggestions
Presenting your spider cupcakes is just as important as making them. Here are some serving ideas:
- Decorative Platter: Arrange your cupcakes on a Halloween-themed platter for a festive touch.
- Candy Accents: Scatter candy corn or chocolate treats around the cupcakes for an extra festive look.
- Pair with Drinks: Serve with a side of spooky punch or hot chocolate to complement the sweet treats.
With these tips and tricks, you’re well on your way to creating the most enchanting spider cupcakes this Halloween. Remember, cooking is all about enjoying the process and letting your creativity shine. Happy baking!
Cookies & Scream Spider Cupcakes
Ingredients
Cake Mix
- 1 box white cake mix
Oreo Cookies
- 2-3 packages Oreos (Halloween Oreos recommended)
- 2-3 cups crushed Oreos (about 200-300 grams)
- to taste candy eyes
- as needed buttercream frosting
- optional Edible glue (for securing candy eyes)
Instructions
-
Prepare the cake mix as per box instructions, folding in 1/2-1 cup crushed Oreos.
-
Mix buttercream according to directions, then fold in 1.5 cups crushed Oreos.
-
Pipe buttercream onto cupcakes using a piping bag and tip.
-
Place Oreo on top and pipe legs with black-tinted buttercream.
-
Use edible glue to attach candy eyes to the Oreo.

![['Close-up view of healthy apple cinnamon rolls, showing their fluffy texture and apple chunks.', 'Side view of golden-brown apple cinnamon rolls with a drizzle of glaze on top.', 'Juicy apple cinnamon rolls sprinkled with powdered sugar, revealing a soft inner layer.', 'Appetizing shot of healthy apple cinnamon rolls, featuring diced apples and cinnamon swirls.']](https://tastykuche.com/wp-content/uploads/2026/07/healthy-apple-cinnamon-rolls_1_U1-150x150.webp)
![['A close-up view of a bowl filled with rich, hearty beef stew featuring tender meat and colorful vegetables.', 'Side view of a steaming bowl of beef stew showcasing chunks of meat, carrots, and potatoes in a savory broth.', 'Delicious slow cooker beef stew presented in a rustic bowl, garnished with herbs.', 'A vibrant and inviting beef stew with visible pieces of beef, carrots, and peas, set against a soft background.']](https://tastykuche.com/wp-content/uploads/2026/07/slow-cooker-beef-stew_1_U1-150x150.webp)