

Unleashing the Power of Homemade Energy Bars
Welcome, dear readers! Today, we’re diving into the delightful world of homemade energy bars—a simple yet fulfilling way to fuel your day. These bars are not only easy to make, but they are also packed with wholesome ingredients that can boost your energy levels without compromising on taste. Whether you need a quick snack before a workout or a nutritious treat during your busy day, this recipe will guide you through making your very own energy bars that are both delicious and satisfying.
Why You’ll Love This Recipe
Here are just a few reasons to get excited about making your own energy bars:
- Customizable: Tailor the ingredients to fit your taste preferences and dietary needs!
- Nutritious: Packed with healthy fats, proteins, and fiber, these bars are a guilt-free snack.
- Quick and Easy: With minimal prep time, you can whip these up in less than an hour!
- Cost-Effective: Save money by making energy bars at home instead of purchasing expensive store-bought options.
- Environmentally Friendly: Reduce packaging waste by creating your own delicious snacks!
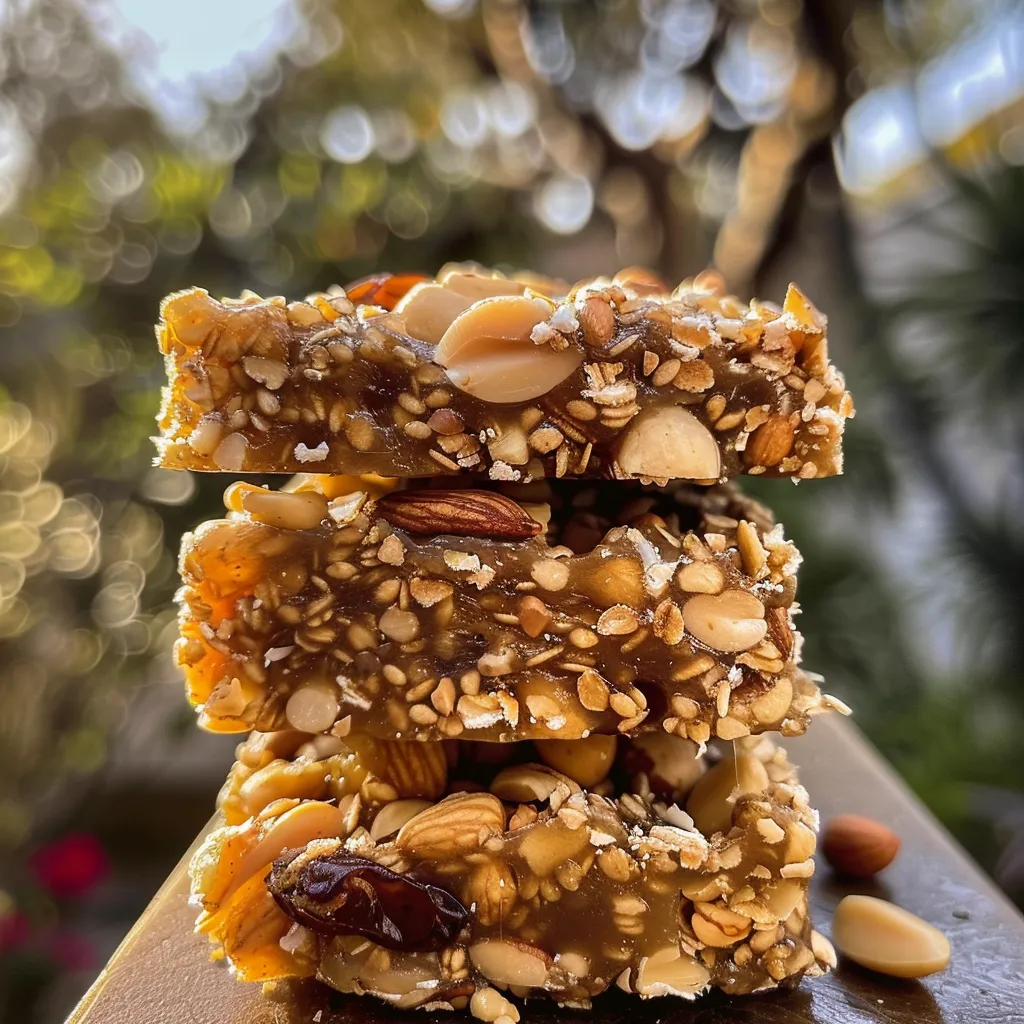
Ingredients Breakdown
To make these nourishing energy bars, you’ll need the following ingredients:
- 70g (½ cup) cashews: Adds a creamy texture and mild sweetness.
- 70g (½ cup) walnuts: Provides earthiness and a delightful crunch.
- 70g (½ cup) almonds: Boosts nuttiness and adds a robust crunch.
- 40g (¼ cup) pine nuts: Contributes a rich, buttery flavor.
- 70g (½ cup) hazelnuts: Offers a unique depth and crunch.
- 70g (⅓ cup) pumpkin seeds: Packed with nutrients and a lovely texture.
- 150g (1 cup) dates, pitted: Acts as a natural sweetener and binds the mixture.
- 50g (½ cup) oatmeal: Provides fiber and helps with texture.
- 3 tablespoons olive oil: Moistens the mixture and adds healthy fats.
- ½ teaspoon salt: Enhances the overall flavor.
- 160ml (½ cup) honey: Natural sweetener that holds everything together.
If you have specific dietary restrictions or preferences, here are some substitutions you can consider:
- Nuts: Feel free to swap cashews, walnuts, or almonds with your favorite nuts or seeds.
- Sweeteners: Maple syrup or agave nectar can replace honey for a vegan option.
- Oats: Use gluten-free oats if you follow a gluten-free diet.
- Olive oil: Coconut oil or almond oil work well as alternatives.
How to Make Your Energy Bars
Now let’s get to the fun part—making your energy bars! Follow these simple steps:
- Step 1: In a dry frying pan over medium heat, lightly roast the cashews, walnuts, almonds, pine nuts, and hazelnuts until fragrant and slightly golden. Remove from heat and set aside.
- Step 2: Using the same pan, roast the pumpkin seeds for a few minutes until they start to pop. Set aside.
- Step 3: Soak the dates in cold water for 15 minutes to soften them.
- Step 4: Drain the dates, remove any pits if necessary, and chop into small pieces.
- Step 5: Use a food processor or mixer to pulse the oatmeal until finer in texture, leaving some small pieces for added crunch.
- Step 6: Warm 3 tablespoons of olive oil in a frying pan over medium heat.
- Step 7: Add the chopped dates to the pan and cook, stirring frequently, for about 5 minutes until softened and beginning to break down.
- Step 8: Stir in the roasted nuts, pumpkin seeds, and processed oatmeal, mixing well with the softened dates.
- Step 9: Add ½ teaspoon salt and pour in 160ml honey. Mix everything together gently, taking care not to overheat the honey to preserve its nutrients.
- Step 10: Line a baking dish or mold with parchment paper greased with olive oil or use siliconized parchment paper for easier removal.
- Step 11: Press the mixture firmly into the lined dish using the back of a spoon or your hands to create an even, compact surface.
- Step 12: Allow the mixture to cool at room temperature, then refrigerate for 1 hour to set.
- Step 13: After chilling, cut the mixture into individual bars using a wet knife to prevent sticking.
- Step 14: Return the bars to the refrigerator for an additional 30 minutes to fully firm up.
- Step 15: Wrap each bar in cling film for easy storage and portability. Keep refrigerated for freshness or freeze for longer storage.
Pro Tips for Perfect Energy Bars
To ensure your energy bars turn out perfectly every time, here are some expert insights:
- Don’t over-roast: Keep an eye on your nuts to prevent them from burning, which can impart a bitter flavor.
- Mix thoroughly: Ensure all ingredients are well-combined for consistent flavor and texture.
- Experiment: Feel free to add spices like cinnamon or vanilla to elevate the flavor profile.
- Storage: Keep your bars in an airtight container in the refrigerator for up to a week.
- Freezing: For longer storage, freeze individual bars wrapped in cling film.
- Texture adjustment: If you prefer a chewier bar, add a bit more honey or dates to the mixture.
- Health boosters: Add chia seeds or flaxseeds for extra nutrients and fiber.
- Cut with care: Use a wet knife to slice your bars to avoid sticking and breakage.
Common Mistakes to Avoid
Even the best of us can stumble in the kitchen! Here are some common pitfalls to watch out for:
- Overheating honey: This can destroy its beneficial properties; keep the heat low.
- Not cooling enough: Allowing the mixture to cool properly is essential for setting.
- Skipping the parchment paper: This can make it difficult to remove the bars from the dish.
Delicious Variations to Try
Once you’ve mastered the basic recipe, why not experiment with these delightful variations?
- Chocolate Chip Energy Bars: Add dark chocolate chips to the mixture for a sweet twist.
- Nut-Free Version: Substitute nuts with sunflower seeds and dried fruits for a nut-free option.
- Protein-Packed Bars: Incorporate protein powder into the mixture for an extra boost.
- Fruit and Nut Bars: Mix in dried fruits like cranberries or apricots for added flavor and texture.
Storage and Make-Ahead Instructions
These energy bars are perfect for meal prep! Here’s how to store them:
- Refrigerator: Keep the bars in an airtight container for up to a week.
- Freezer: For longer shelf life, wrap each bar and store them in the freezer for up to 3 months.
Frequently Asked Questions
Got questions? Here are some common inquiries about homemade energy bars:
- Can I use different nuts? Absolutely! Feel free to substitute with your favorites.
- Are these bars gluten-free? Yes, as long as you use gluten-free oats.
- How do I know when they are set? The bars should feel firm to the touch after chilling.
- Can I add protein powder? Yes, adding protein powder is a great way to boost nutrition.
- What’s the best way to cut the bars? Use a wet knife to slice through the mixture for clean edges.
- Can I use maple syrup instead of honey? Yes, maple syrup can be a great substitute.
- How long do they last? They can last up to a week in the refrigerator or 3 months in the freezer.
- Can I make them vegan? Definitely! Replace honey with maple syrup and ensure all ingredients are plant-based.
Nutritional Tips and Dietary Adaptations
These energy bars are already nutritious, but here are some tips to make them even healthier:
- Substitute sweeteners: Use less honey or opt for natural sweeteners like stevia or monk fruit.
- Add superfoods: Incorporate spirulina or cacao nibs for an extra nutrient boost.
- Portion control: Cut bars into smaller pieces for a satisfying yet controlled treat.
Essential Equipment You’ll Need
To prepare these energy bars, here are some handy kitchen tools:
- Food processor: Essential for mixing and chopping ingredients.
- Mixing bowls: For combining ingredients smoothly.
- Baking dish: A square or rectangular dish for setting the bars.
- Parchment paper: Makes it easy to remove the bars once set.
- Measuring cups and spoons: For accurate ingredient measurements.
Serving Suggestions
Enjoy your homemade energy bars in various ways:
- On-the-go snack: Perfect for busy mornings or afternoon pick-me-ups!
- Post-workout boost: A great way to refuel after exercise.
- Lunchbox treat: Pack them in lunchboxes for a healthy snack option.
- With a cup of tea: Enjoy alongside your favorite warm beverage for a cozy treat.
In conclusion, making your own energy bars is not only rewarding but also a fantastic way to take control of your nutrition. With this comprehensive recipe and guide, you can create delicious, nourishing snacks that fit perfectly into your lifestyle. So gather your ingredients, embrace the process, and enjoy the joy of homemade energy bars. Happy cooking!
Homemade Energy Bars Packed with Strength and Energy Recipe
Ingredients
nuts and seeds
- 70 g cashews
- 70 g walnuts
- 70 g almonds
- 40 g pine nuts
- 70 g hazelnuts
- 70 g pumpkin seeds
- 150 g dates, pitted
- 50 g oatmeal
- 3 tablespoons olive oil
- 0.5 teaspoon salt
- 160 ml honey
Instructions
- Lightly roast nuts and pumpkin seeds in a dry pan, then set aside.
- Soak and chop dates; then cook with olive oil until softened.
- Pulse oatmeal in a food processor for a finer texture.
- Mix softened dates, roasted nuts, pumpkin seeds, oatmeal, salt, and honey until combined.
- Press mixture into a lined dish, cool, then refrigerate to set. Cut into bars and wrap.

