
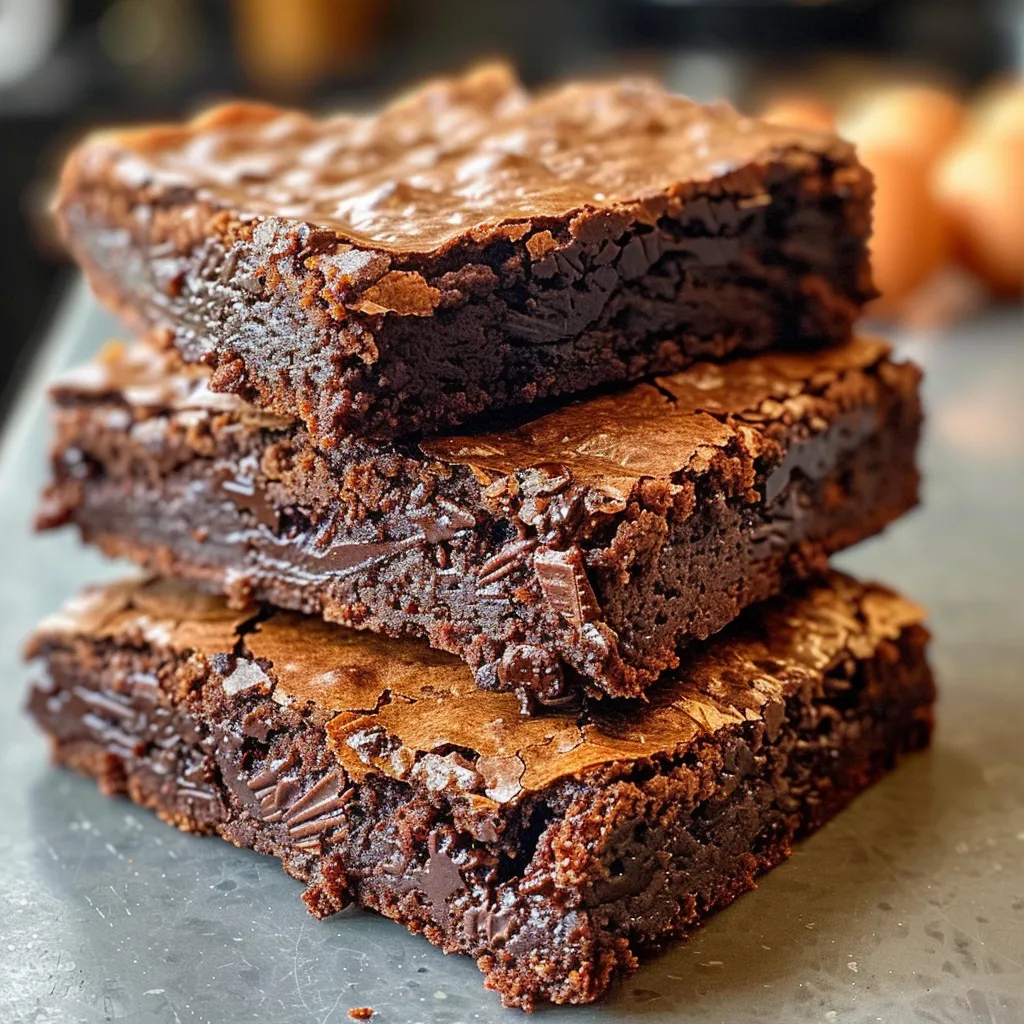
Discover the Joy of Baking: Decadent Gluten-Free Oat Flour Brownies
Welcome to the world of gluten-free baking, where deliciousness meets simplicity! In this article, we’re diving deep into the art of making rich and fudgy gluten-free oat flour brownies. Using straightforward ingredients, these brownies are not only easy to prepare but also bursting with flavor, making them the perfect treat for any occasion. Whether you’re an experienced baker or just starting your culinary journey, this recipe is designed to inspire and empower you to create something truly special!
Why You’ll Love This Recipe
There are countless reasons to fall in love with these gluten-free oat flour brownies. Here are just a few:
- Rich Flavor: The combination of cocoa powder and dark chocolate chips creates a deep, indulgent chocolate flavor that satisfies any sweet tooth.
- Simple Ingredients: With just a handful of pantry staples, you can whip up a batch of brownies that are both delightful and nourishing.
- Gluten-Free Goodness: Made with oat flour, these brownies are perfect for those with gluten sensitivities, allowing everyone to enjoy a sweet treat.
- Versatile Recipe: This brownie base can be easily adapted with various add-ins and flavorings to suit your taste preferences.
- Quick to Make: From mixing to baking, you can have these brownies ready in under an hour—perfect for those spontaneous dessert cravings!
Ingredients You Need for This Recipe
Let’s gather our ingredients! Here’s what you’ll need to make these decadent brownies:
- 1 cup granulated sugar: Sweetness is key for fudgy brownies.
- 2 tbsp boiling water: This helps to dissolve the sugar and enhance the brownie’s texture.
- ½ cup melted butter: Adds richness and moisture.
- ½ tsp vanilla extract: A touch of vanilla enhances the overall flavor.
- 2 large eggs (beaten): Provides structure and a lovely chewy texture.
- ¾ cup oat flour: The star ingredient, offering a gluten-free base.
- ½ tsp baking powder: Helps the brownies rise slightly.
- ¾ tsp salt: Balances the sweetness.
- ⅔ cup cocoa powder: For that deep chocolate flavor.
- ½ cup powdered sugar: Adds sweetness and a touch of creaminess.
- ½ cup mini dark chocolate chips: For melty chocolate goodness in every bite.
### Ingredient Substitutions
- Butter: You can substitute with coconut oil or a dairy-free butter for a vegan option.
- Granulated Sugar: Use coconut sugar or a sugar substitute like erythritol for a lower-calorie option.
- Oat Flour: If you don’t have oat flour, you can blend rolled oats into a fine flour.
- Eggs: For an egg-free version, try using flax eggs (1 tbsp ground flaxseed mixed with 2.5 tbsp water per egg).
How to Make These Gluten-Free Brownies
Now that we have our ingredients ready, let’s dive into the step-by-step process of making these delicious brownies:
- Preheat the oven: Set your oven to 325°F (160°C). Prepare an 8×8 inch baking dish by spraying it with cooking spray and lining it with parchment paper. Don’t forget to spray the parchment paper as well!
- Mix the dry ingredients: In a medium bowl, combine the powdered sugar, baking powder, oat flour, cocoa powder, salt, and mini chocolate chips. Stir until evenly mixed.
- Prepare the wet mixture: In a large bowl, mix the granulated sugar with the boiling water until dissolved. Add the melted butter, vanilla extract, and beaten eggs. Mix until well combined.
- Combine wet and dry ingredients: Sprinkle the dry ingredient mixture over the wet ingredients. Stir gently until just combined; be careful not to over-mix!
- Bake: Pour the batter into the prepared baking pan and smooth the top. Bake for about 45 minutes, or until a toothpick inserted into the center comes out mostly clean.
- Cool: Allow the brownies to cool for about 2 hours (if you can resist!) before cutting them into squares.
Expert Tips for Making Healthy Brownies
To ensure your brownies turn out perfectly every time, here are some expert tips to keep in mind:
- Don’t over-mix: Gently combine the ingredients to keep the brownies fudgy and tender.
- Use quality cocoa powder: The type of cocoa powder can affect flavor; opt for high-quality, unsweetened cocoa for the best results.
- Check for doneness: Every oven is different, so start checking your brownies a few minutes before the suggested baking time.
- Let them cool: Allowing the brownies to cool completely before cutting helps them set and makes for cleaner cuts.
- Experiment with add-ins: Feel free to add nuts, dried fruit, or even a swirled layer of peanut butter for a twist!
- Store properly: Keep brownies in an airtight container at room temperature for up to 3 days or in the refrigerator for a week.
- Use parchment paper: Lining your baking dish with parchment makes it easier to lift out the brownies once they’re baked.
- Don’t skip the salt: Salt enhances the sweetness and balances the flavors, making your brownies even more delicious.
Common Mistakes and Troubleshooting
Even the best bakers can run into a few hiccups along the way. Here are some common mistakes and how to avoid them:
- Brownies are too dry: This can happen if you overbake them or if the oven is too hot. Always check for doneness a few minutes before the suggested time.
- Brownies are too gooey: If they’re too undercooked, they won’t set properly. Ensure they’re baked until a toothpick comes out mostly clean.
- Uneven texture: This can result from not mixing the batter enough or using stale ingredients. Ensure everything is fresh and mixed well.
Variations to Try
This recipe is incredibly versatile, allowing you to put your own spin on it. Here are some variations to consider:
- Nutty Brownies: Add ½ cup of chopped walnuts or pecans for added crunch and flavor.
- Mint Chocolate Brownies: Stir in a few drops of peppermint extract for a refreshing twist.
- Peanut Butter Swirl: Before baking, drop spoonfuls of peanut butter into the batter and use a knife to swirl it through.
- Fruity Brownies: Incorporate ½ cup of dried cherries or cranberries for a sweet and tart flavor contrast.
Storage and Make-Ahead Instructions
These brownies can be made ahead of time and stored for later enjoyment. Here’s how:
- Room Temperature: Store in an airtight container at room temperature for up to 3 days.
- Refrigerator: Keep them in the fridge for up to a week. They may even taste better the next day as the flavors meld!
- Freezer: Freeze brownies by wrapping them tightly in plastic wrap and placing them in an airtight container. They can last up to 3 months. Thaw at room temperature before serving.
Comprehensive FAQ
To help you navigate any questions you may have, here are some frequently asked questions about gluten-free oat flour brownies:
- Can I use regular flour instead of oat flour? Yes, but the recipe will no longer be gluten-free. Substitute with all-purpose flour at a 1:1 ratio.
- How do I know when the brownies are done? Insert a toothpick into the center; it should come out mostly clean with a few moist crumbs.
- Can I substitute the eggs? Yes, you can use flax eggs or applesauce as a vegan alternative.
- What type of cocoa powder should I use? Use unsweetened cocoa powder for the best flavor; Dutch-processed cocoa can also work well.
- Can I add chocolate chips to the batter? Absolutely! Mini dark chocolate chips add extra chocolatey goodness.
- What if I don’t have a baking pan? You can use a cast-iron skillet or any oven-safe dish; just adjust the baking time as needed.
- Can I make these brownies dairy-free? Yes, simply use dairy-free butter or coconut oil in place of regular butter.
- What’s the best way to cut brownies? For clean cuts, use a sharp knife and wipe it between cuts to avoid tearing the brownies.
Nutrition Tips and Dietary Adaptations
If you’re looking to make these brownies even healthier, consider these tips:
- Reduce sugar: You can experiment with reducing the granulated sugar or using natural sweeteners like maple syrup or honey.
- Add fiber: Incorporate ground flaxseeds or chia seeds for added nutrition and fiber.
- Use dark chocolate: Opt for dark chocolate chips with a higher cocoa content for a more intense flavor and potential health benefits.
Equipment Recommendations
To make your baking experience seamless, here are a few essential tools:
- Mixing bowls: A set of various sizes will help you combine ingredients easily.
- Whisk: For blending wet ingredients and ensuring everything is well combined.
- Measuring cups and spoons: Precision is key in baking, so invest in a good set.
- Baking pan: An 8×8 inch square pan is ideal for brownies, but feel free to use whatever you have!
- Parchment paper: This makes clean-up a breeze and prevents sticking.
Serving Suggestions
Once your brownies are baked and cooled, it’s time to enjoy them! Here are some serving ideas:
- With Ice Cream: Serve warm brownies topped with a scoop of vanilla or chocolate ice cream for a delicious dessert.
- Drizzled with Chocolate Sauce: A drizzle of melted chocolate on top adds an extra touch of sweetness.
- With Fresh Berries: Pair brownies with fresh strawberries or raspberries for a fruity contrast.
- With Whipped Cream: A dollop of whipped cream adds a light and airy texture to your decadent brownies.
Conclusion
In conclusion, these gluten-free oat flour brownies are a delightful treat that anyone can master. Whether you’re baking for yourself, friends, or family, this recipe promises to bring warmth and joy to your kitchen. Remember, cooking is about enjoying the process and experimenting with flavors. So, gather your ingredients, follow the steps, and soon you’ll be indulging in a rich, fudgy brownie that warms the heart. Happy baking!
Gluten-Free Oat Flour Brownies
Ingredients
Dry ingredients
- 1 cup granulated sugar
- 3/4 cup oat flour
- 1/2 tsp baking powder
- 3/4 tsp salt
- 2/3 cup cocoa powder
- 1/2 cup powdered sugar
- 1/2 cup mini dark chocolate chips
Wet ingredients
- 1/2 cup butter (melted)
- 1/2 tsp vanilla extract
- 2 large eggs (beaten)
- 2 tbsp water boiling
Instructions
- Preheat oven to 325°F. Line an 8x8 baking dish with parchment paper and spray with cooking spray.
- In a medium bowl, combine powdered sugar, baking powder, oat flour, cocoa powder, salt, and chocolate chips.
- In a large bowl, mix granulated sugar with boiling water. Add melted butter, vanilla, and eggs; stir until smooth.
- Gradually add dry ingredients to wet mixture, stirring until just combined. Do not over-mix.
- Pour batter into prepared pan, smooth the top, and bake for 45 minutes. Cool before cutting.