Author

Noah

Browsing

Start Your Day Right with Wholesome Oat Waffles

Welcome to a cozy morning filled with the delightful aroma of warm waffles! If you’re seeking a comforting, nourishing breakfast, you’ve come to the right place. These wholesome oat waffles are not only easy to make but also packed with goodness. They bring together the rich, nutty flavor of oats with just the right crunch, making them the perfect start to your day. Let’s dive into the details of this delightful recipe!

Why You’ll Love This Recipe

These waffles are sure to become a favorite in your home! Here’s why:

  • Healthier alternative: Made with rolled oats, these waffles are high in fiber and nutrients, making them a wholesome choice for breakfast.
  • Quick and easy: With just a few simple steps and minimal prep time, you can have delicious waffles ready in no time.
  • Customizable: You can easily adapt the recipe to suit your taste by adding fruits, nuts, or spices.
  • Freezer-friendly: Make a big batch and freeze them for quick breakfasts throughout the week.
  • Perfect for everyone: Whether you’re gluten-free or following a healthy diet, this recipe can be tailored to fit your needs!

Ingredients You’ll Need

Below are the ingredients for your oat waffles, along with some suggested substitutions to suit your pantry and preferences:

  • 2/3 cup rolled oats: For a gluten-free version, use certified gluten-free oats.
  • 1 tsp baking powder: This helps the waffles rise and become fluffy.
  • 1/4 tsp sea salt: Enhances the flavor of the waffles.
  • 1/8 tsp cinnamon: Adds a warm, comforting spice to your waffles.
  • 3/8 cup water: Adjust as necessary to reach your desired batter consistency.
  • 2 tbsp melted coconut oil: You can substitute with vegetable oil or melted butter.
  • 1 egg: If you need a vegan option, use a flax egg instead.
  • 1 tbsp maple syrup: Provides natural sweetness; feel free to use honey or agave syrup.
  • 1/2 tsp vanilla: Enhances the overall flavor of the waffles.

The Method: How to Make Wholesome Oat Waffles

Juicy oat waffles neatly stacked, showcasing their texture and color.

Making these delicious waffles is a breeze! Follow these simple steps:

  1. Place all of the ingredients in a blender and blend until smooth.
  2. Allow the batter to sit in the blender for 10 minutes while you preheat your waffle iron.
  3. Spoon 1/4-1/3 cup of batter onto the heated waffle iron and cook until lightly browned and crisp, approximately 2-5 minutes.
  4. Enjoy warm, topped with your favorite fruits, syrup, or yogurt!

Pro Tips for Perfect Waffles

Here are some expert insights to ensure your waffles turn out perfectly every time:

  • Preheat your waffle iron: This is key to achieving a crispy exterior and fluffy inside.
  • Don’t overcrowd the waffle iron: Allow enough space for the batter to expand while cooking.
  • Let the batter rest: Resting the batter helps the oats absorb moisture and improves texture.
  • Experiment with flavors: Feel free to add your favorite spices, such as nutmeg or ginger, for a unique twist.
  • Keep them warm: If making a large batch, keep cooked waffles warm in a low oven until ready to serve.
  • Use cooking spray or oil: Lightly grease the waffle iron before adding the batter to prevent sticking.
  • Try different toppings: From fresh fruit to nut butter or yogurt, the possibilities are endless!
  • Store leftovers properly: Allow waffles to cool completely before storing them in an airtight container or freezing.

Common Mistakes and Troubleshooting

If your waffles aren’t turning out as expected, check for these common pitfalls:

  • Waffles sticking to the iron: Ensure you’ve preheated your waffle iron and greased it well.
  • Gummy texture: This can occur if the batter is overmixed. Blend just until combined.
  • Flat waffles: Make sure your baking powder is fresh; old leavening agents can lead to dense waffles.

Delicious Variations to Try

Want to mix it up? Here are some variations to experiment with:

  • Banana Oat Waffles: Add mashed ripe bananas to the batter for natural sweetness and moisture.
  • Blueberry Oat Waffles: Fold in fresh or frozen blueberries for a burst of flavor.
  • Chocolate Chip Oat Waffles: Incorporate dark chocolate chips for a decadent touch.
  • Nutty Oat Waffles: Add chopped nuts or nut butter for extra protein and crunch.

Storage and Make-Ahead Instructions

Planning for busy mornings? Here’s how to store and prepare your waffles:

  • Refrigerate: Store cooked waffles in an airtight container in the fridge for up to 3 days.
  • Freeze: For longer storage, freeze waffles in a single layer, then transfer to a zip-top bag. They’ll keep for up to 3 months.
  • Reheat: Pop frozen waffles in the toaster or oven until heated through and crispy.

Frequently Asked Questions

Got questions? Here are answers to some common inquiries about oatmeal waffles:

  • Can I make these waffles gluten-free? Absolutely! Just use certified gluten-free oats.
  • How do I know when my waffles are done? They should be golden brown and crisp. If they’re sticking, they may need a bit more time.
  • Can I use quick oats instead of rolled oats? Yes, but the texture may vary. Rolled oats give a heartier bite.
  • What can I serve with these waffles? Try them with yogurt, fresh fruit, syrup, or a sprinkle of nuts.
  • Is it possible to make the batter ahead of time? Yes! Store the batter in the fridge for up to 24 hours before cooking.
  • Can I substitute the egg? Yes, a flax egg or unsweetened applesauce can work as an egg substitute.
  • How do I keep waffles warm? Place them on a baking sheet in a low oven (around 200°F) until ready to serve.
  • Can I double the recipe? Of course! Just ensure you have enough space in your waffle iron for the batter.

Nutritional Tips and Dietary Adaptations

For a more balanced meal, consider the following:

  • Add protein: Top your waffles with Greek yogurt or nut butter for an added protein boost.
  • Increase fiber: Include chia seeds or ground flaxseed in the batter.
  • Lower sugar options: Use ripe bananas or applesauce to reduce the amount of added sweeteners.

Essential Equipment Recommendations

To make your waffle-making experience smooth and enjoyable, here are some essential tools:

  • Waffle Iron: A reliable non-stick waffle iron ensures easy release and crisp results.
  • Blender: A high-speed blender makes quick work of mixing the batter to a smooth consistency.
  • Spatula: A silicone spatula is great for handling the batter with ease.

Serving Suggestions

Once your waffles are ready, it’s time to enjoy them! Here are some delightful serving ideas:

  • Top with fresh fruit: Strawberries, blueberries, or sliced bananas add color and flavor.
  • Drizzle with syrup: Maple syrup, honey, or agave syrup make a sweet touch.
  • Sprinkle with nuts: Chopped walnuts or almonds add a satisfying crunch.
  • Serve with yogurt: A dollop of Greek yogurt adds creaminess and protein.

Conclusion: Your New Favorite Breakfast Awaits!

There you have it—a comprehensive guide to making delicious and wholesome oat waffles! With their simplicity and versatility, these waffles are sure to become a beloved recipe in your home. Remember, cooking should be enjoyable, so take your time and savor the process. I hope you find joy in making and sharing these delightful waffles. Thank you for choosing this recipe; I’m glad you’re here, and I’m excited for you to enjoy every bite!

Oat Waffles

Prep Time 10 minutes
Cook Time 5 minutes
Total Time 15 minutes
Servings 2 servings
Calories 180
Enjoy these healthy and delicious oat waffles, perfect for a quick breakfast or brunch.

Ingredients

Dry ingredients

  • 2/3 cup rolled oats
  • 1 tsp baking powder
  • 1/4 tsp sea salt
  • 1/8 tsp cinnamon

Wet ingredients

  • 3/8 cup water
  • 2 tbsp melted coconut oil
  • 1 egg egg
  • 1 tbsp maple syrup
  • 1/2 tsp vanilla

Instructions 

  • Blend all ingredients until smooth, then let sit for 10 minutes.
  • Preheat waffle iron.
  • Spoon batter onto waffle iron and cook until golden (2-5 minutes).
  • Serve and enjoy!

Notes

For extra flavor, add fresh berries or nuts.
Calories: 180kcal
Cost: $8
Course: Breakfast
Cuisine: American
Keyword: Oats

Discover the Comfort of Italian Baked Eggs

Welcome to a delightful culinary journey with Italian baked eggs, a comforting dish that warms both the heart and the home. This recipe, often referred to as eggs in purgatory, combines the rich flavors of tomatoes, aromatic garlic, and fresh basil with perfectly baked eggs. Whether it’s for breakfast, brunch, or a cozy dinner, this dish is not only simple to make but also incredibly satisfying. Let’s dive into the details of this wonderful recipe and explore why you’ll love making it at home.

Why You’ll Love This Recipe

  • Comforting flavors: The combination of rich tomato sauce and eggs creates a warm, homely taste that’s hard to resist.
  • Quick and easy: With just a few ingredients and straightforward steps, you can whip up this dish in under 30 minutes.
  • Customizable: Feel free to add your favorite vegetables, cheeses, or spices for a personal touch.
  • Perfect for sharing: This dish is best served straight from the pan, making it a lovely communal meal.
  • Healthy and nourishing: Packed with protein and vitamins from the eggs and tomatoes, this recipe is both nutritious and filling.

Ingredients for Italian Baked Eggs

To prepare this delicious Italian baked eggs recipe, you’ll need the following ingredients:

  • 2 Tablespoon extra virgin olive oil: Adds richness and flavor to the dish.
  • 3-4 cloves fresh garlic (minced, approximately 1 Tablespoon): Brings aromatic goodness to the sauce.
  • Pinch crushed red pepper flakes: For a subtle kick of heat.
  • 28 ounces canned whole peeled tomatoes (San Marzano certified, if possible): The star of the sauce; choose high-quality tomatoes for the best flavor.
  • 10-12 large fresh basil leaves (plus extra for garnish, if desired): Adds freshness and a hint of sweetness.
  • 1 teaspoon kosher salt (divided use): Enhances the overall flavor.
  • ½ teaspoon black pepper (divided use): Provides a mild spice.
  • 6 large eggs: The main protein source that makes this dish satisfying.
  • Parmesan cheese (freshly grated for serving): Optional, but adds a lovely finishing touch.

Step-by-Step Instructions to Make Italian Baked Eggs

Juicy Italian Baked Eggs in a rich tomato sauce, garnished with fresh basil.

Now that we have our ingredients ready, let’s walk through the simple steps to create this delightful dish.

  1. Preheat the oven: Preheat your oven to 400˚F (200˚C) and heat a 10″ cast iron skillet over medium heat on the stovetop.
  2. Add olive oil: Pour in the extra virgin olive oil, swirling it around to coat the bottom of the skillet.
  3. Sauté garlic: Add the minced garlic and crushed red pepper flakes, sautéing for about 1 minute until the garlic is fragrant and lightly browned.
  4. Prepare tomatoes: Carefully add the whole peeled tomatoes, breaking them up into smaller pieces with a spoon.
  5. Add basil and season: Tear the fresh basil leaves and add them to the sauce, along with ½ teaspoon of kosher salt and ¼ teaspoon of black pepper. Stir to combine.
  6. Simmer the sauce: Reduce the heat to medium-low and let the sauce simmer for about 5 minutes, continuing to break up the tomatoes until they are well incorporated.
  7. Crack the eggs: Make small wells in the sauce and gently break the eggs into the wells, leaving space around each egg. Sprinkle with the remaining salt and pepper.
  8. Bake the dish: Place the skillet in the preheated oven and bake for 7-9 minutes, or until the whites are set and the yolks are cooked to your desired doneness.
  9. Serve immediately: Remove the skillet from the oven and serve right away, topped with freshly grated parmesan cheese and extra basil if desired.

Pro Tips for Perfect Italian Baked Eggs

  • Choose quality ingredients: Using high-quality canned tomatoes, like San Marzano, elevates the flavor of the sauce.
  • Fresh herbs are key: Fresh basil truly enhances the dish; dried herbs won’t provide the same vibrant taste.
  • Watch the eggs closely: Baking time can vary; keep an eye on the eggs to achieve your preferred doneness.
  • Customize your toppings: Consider adding crumbled feta or goat cheese for a unique twist.
  • Experiment with spices: Feel free to add herbs like oregano or thyme for added depth.
  • Use a deeper skillet: A deeper skillet allows for more sauce and prevents overflow during baking.
  • Serve with crusty bread: Pair your baked eggs with crusty bread for dipping and scooping up the delicious sauce.
  • Make it ahead: Prepare the sauce in advance and store it. When you’re ready, just crack the eggs and bake!

Common Mistakes and Troubleshooting

Even though this dish is straightforward, here are some common pitfalls to avoid:

  • Overcooking the eggs: Keep an eye on the eggs in the oven; overcooked yolks can become rubbery.
  • Using too much salt: Adjust the salt to your taste, especially if your canned tomatoes are already salted.
  • Skipping the garlic: Garlic adds essential flavor; don’t omit it!

Delicious Variations to Try

If you’re feeling adventurous, here are some variations to elevate your Italian baked eggs:

  • Italian Sausage and Peppers: Sauté sliced sausage with bell peppers and onions before adding the tomatoes for a heartier dish.
  • Spinach and Feta: Stir in fresh spinach and sprinkle crumbled feta cheese for a Mediterranean twist.
  • Mushroom Medley: Add sautéed mushrooms for an earthy flavor that pairs beautifully with the sauce.
  • Spicy Chorizo: Incorporate spicy chorizo for a kick and a smoky flavor.

Storage and Make-Ahead Instructions

This dish is best enjoyed fresh, but you can make it ahead and store it:

  • Refrigeration: Store leftovers in an airtight container in the fridge for up to 3 days.
  • Freezing: While the egg texture may change, you can freeze the sauce for up to 2 months. Just reheat and add fresh eggs when ready to serve.
  • Make-ahead sauce: Prepare the sauce in advance, refrigerate, and heat up before adding the eggs.

Frequently Asked Questions

Here are some common questions about Italian baked eggs:

  • Can I use fresh tomatoes instead of canned? Yes, you can use fresh tomatoes; just ensure they are ripe and juicy.
  • What can I substitute for eggs? For a vegan version, consider using tofu or chickpea flour for a similar texture.
  • Is this dish gluten-free? Yes, the ingredients are naturally gluten-free, but always check labels.
  • Can I prepare this dish in advance? Yes, you can prepare the sauce ahead of time and bake it with eggs when ready.
  • What sides go well with this dish? Serve with a fresh salad or crusty bread to soak up the sauce.
  • How do I adjust the spice level? Add more or fewer red pepper flakes according to your heat preference.
  • Can I use a different type of cheese? Absolutely! Mozzarella or goat cheese are excellent alternatives.
  • Is it possible to double the recipe? Yes, simply use a larger skillet or bake in batches!

Nutrition Tips and Dietary Adaptations

This recipe can be adapted to fit various dietary needs:

  • Low-carb option: Serve it with a side of sautéed vegetables instead of bread.
  • Vegetarian-friendly: Already vegetarian, but you can add more veggies for extra nutrition.
  • High-protein boost: Include some cooked quinoa or beans for added protein.

Recommended Equipment

For this recipe, you will need a few essential kitchen tools:

  • 10-inch cast iron skillet: Ideal for even cooking and serving.
  • Wooden spoon: Perfect for stirring the sauce without scratching your skillet.
  • Measuring cups and spoons: Ensure accuracy in your recipe.

Serving Suggestions

To enjoy your Italian baked eggs to the fullest, consider these serving ideas:

  • Pair with crusty bread: Ideal for dipping into the rich sauce.
  • Fresh salad: A light salad with lemon vinaigrette complements the dish beautifully.
  • Herb garnish: Finish with fresh basil or parsley for a pop of color and flavor.

Conclusion

Italian baked eggs are more than just a meal; they’re a comforting experience that brings warmth to your table. With their rich flavors and satisfying nature, this dish is perfect for any occasion. Remember, cooking is about enjoying the process and sharing moments with loved ones. So gather your ingredients, follow these steps, and indulge in the joy of making this simple yet delightful recipe. Happy cooking!

Easy Italian Baked Eggs (Eggs in Purgatory)

Prep Time 10 minutes
Cook Time 15 minutes
Total Time 25 minutes
Servings 4 servings
Calories 250
A flavorful and simple Italian-inspired baked eggs dish cooked in a spicy tomato sauce, perfect for a quick breakfast or brunch.

Ingredients

Oil

  • 2 tablespoons extra virgin olive oil

Garlic

  • 3-4 cloves fresh garlic (minced) (approximately 1 tablespoon)

Red pepper flakes

  • pinch crushed red pepper flakes

Tomatoes

  • 28 ounces canned whole peeled tomatoes (San Marzano preferred)

Basil

  • 10-12 leaves fresh basil leaves (plus extra for garnish)
  • 1 teaspoon kosher salt (divided use)
  • ½ teaspoon black pepper (divided use)
  • 6 large eggs

Parmesan cheese

  • to taste freshly grated Parmesan cheese (for serving)

Instructions 

  • Preheat oven to 400˚F. Heat a cast iron skillet over medium heat and add olive oil.
  • Add minced garlic and red pepper flakes; sauté for 1 minute until fragrant.
  • Add tomatoes and break them up; stir in basil, salt, and pepper. Simmer for 5 minutes.
  • Create space for eggs, crack them into the sauce, season, and transfer skillet to oven. Bake for 7-9 minutes until whites are set.
  • Remove from oven, garnish with Parmesan and basil, and serve immediately.

Notes

Use high-quality canned tomatoes for best flavor.
Calories: 250kcal
Cost: $15
Course: Breakfast, Brunch
Cuisine: Italian
Keyword: baked, Eggs, Tomato

Discover the Joy of Spinach Ricotta Bites

Welcome to a delightful culinary journey where we explore how to create scrumptious Spinach Ricotta Bites. This recipe is not only easy to follow but also perfect for gatherings or cozy nights in. Combining creamy ricotta, flavorful spinach, and a hint of cheese, these bites are destined to become a favorite in your kitchen. Whether you’re looking for a quick snack or a crowd-pleasing appetizer, this recipe delivers on both flavor and simplicity.

Why You’ll Love This Recipe

Let’s dive into the reasons why these spinach ricotta bites are a must-try:

  • Quick and Easy: These bites come together in just a few simple steps, making them perfect for busy weeknights or spontaneous gatherings.
  • Nutritious: Packed with spinach and ricotta, they are rich in vitamins, protein, and calcium, offering a wholesome snack option.
  • Versatile: You can easily customize the ingredients based on your dietary preferences or what you have on hand.
  • Great for Meal Prep: Make a batch ahead of time and store them for easy snacking throughout the week.
  • Crowd-Pleaser: Their bite-sized nature makes them ideal for parties, potlucks, or family gatherings.

Ingredients for Spinach Ricotta Bites

Here’s what you’ll need to make these delightful bites:

  • 2 tablespoons butter
  • 1 small yellow onion, chopped
  • 1 clove garlic, minced
  • 2 large eggs, beaten
  • 1 cup ricotta cheese (low or full-fat ricotta will work)
  • 1/2 cup mozzarella cheese, shredded
  • 1/2 cup parmesan cheese, grated
  • 10-ounce package frozen chopped spinach, defrosted and drained well (squeeze out as much liquid as possible)
  • 1/4 teaspoon kosher salt

**Substitutions & Variations**: You can easily swap or add ingredients to suit your taste:

  • Cheese Variations: Substitute mozzarella or parmesan with feta or goat cheese for a different flavor profile.
  • Herbal Touch: Add fresh herbs like basil or dill for an aromatic twist.
  • Spicy Kick: Mix in some red pepper flakes or jalapeños for a hint of heat.
  • Veggie Boost: Include finely chopped bell peppers or mushrooms for added nutrients and texture.

How to Make Spinach Ricotta Bites: Easy Baking Guide

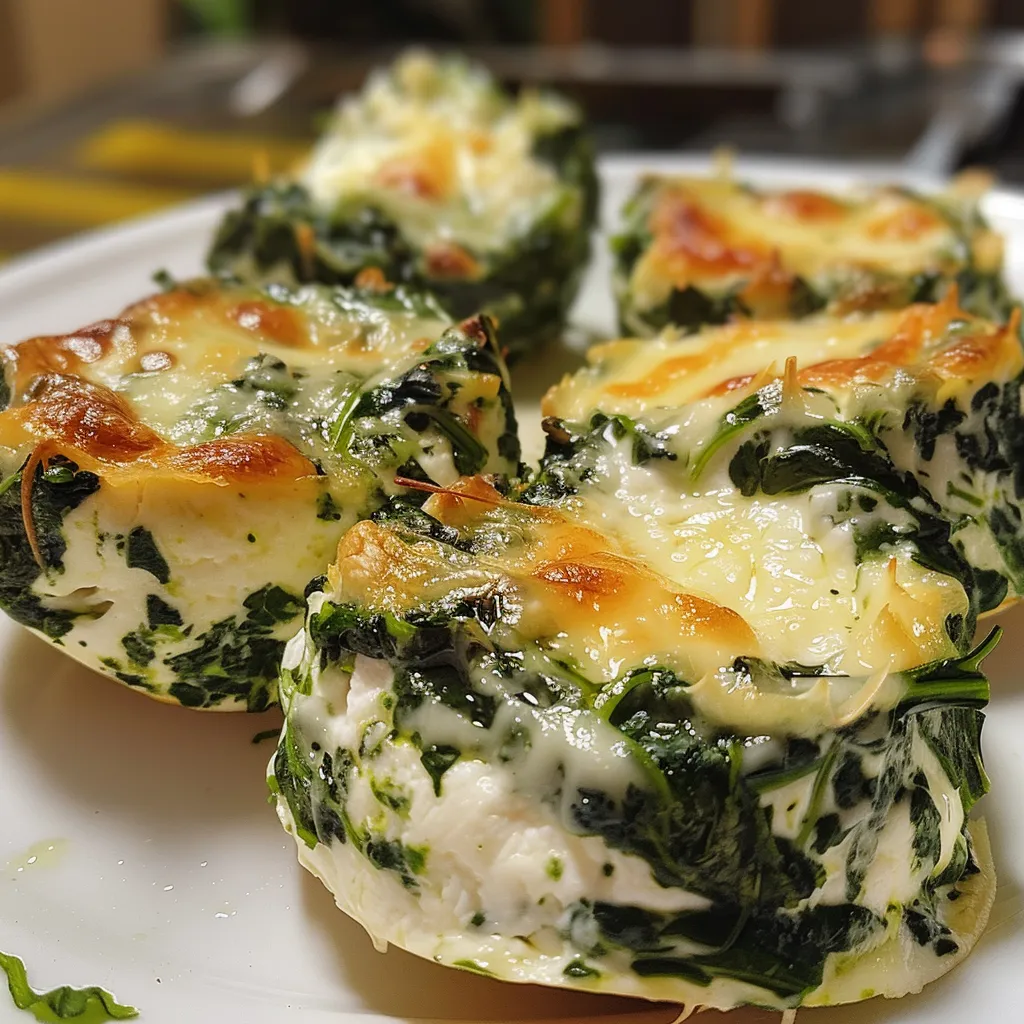
A side view of delicious Spinach Ricotta Bites showcasing their crispy exterior.

Follow these simple steps to create your spinach ricotta bites:

  1. Preheat the Oven: Preheat your oven to 375°F (190°C). Coat a mini muffin tin with grease or use paper liners for easy removal.
  2. Prepare the Onion and Garlic: Melt the butter in a small skillet over medium heat. Add chopped onion and cook for about 5 minutes, until soft and translucent. Stir in minced garlic and cook for another minute. Remove from heat and let cool slightly.
  3. Combine the Ingredients: In a large mixing bowl, combine beaten eggs, ricotta cheese, shredded mozzarella, grated parmesan, and drained spinach. Add the sautéed onion and garlic mixture, seasoning with kosher salt. Mix until well combined.
  4. Fill the Muffin Tin: Spoon the mixture into the prepared muffin tin, filling each cup to the top.
  5. Bake: Bake in the preheated oven for 20-25 minutes, until the tops are golden brown and the bites are set.
  6. Cool and Serve: Allow the bites to cool in the tin for a few minutes before transferring them to a wire rack to cool completely. Serve warm or at room temperature.

Pro Tips for Perfect Spinach Ricotta Bites

Enhance your cooking experience with these expert insights:

  • Drain Well: Ensure your spinach is thoroughly drained to prevent soggy bites.
  • Egg Temperature: Use eggs at room temperature for better emulsification.
  • Cheese Mix: Experiment with different cheese blends for unique flavors.
  • Don’t Overmix: Mix just until combined to keep the texture light and airy.
  • Check Doneness: The bites are ready when they are golden brown on top and firm to the touch.
  • Cooling Time: Let them cool slightly in the tin to help them set before transferring.
  • Perfect for Freezing: These bites freeze well. Just reheat in the oven for a quick snack.
  • Serving Ideas: Pair with a side of marinara or a yogurt dip for extra flavor.

Common Mistakes and Troubleshooting

Here’s how to avoid common pitfalls:

  • Too Watery: If your bites are too wet, check that the spinach is well-drained and that you haven’t added too many wet ingredients.
  • Burnt Tops: If the tops brown too quickly, cover with foil during the last few minutes of baking.
  • Underbaked Bites: If they don’t seem set after the recommended baking time, give them a few extra minutes.

Storage and Make-Ahead Instructions

To keep your spinach ricotta bites fresh:

  • Refrigerate: Store in an airtight container in the fridge for up to 4 days.
  • Freeze: Freeze in a single layer, then transfer to a freezer bag. They can be stored for up to 3 months.
  • Reheat: To reheat, place them in a preheated oven at 350°F (175°C) for 10-15 minutes until warmed through.

Frequently Asked Questions (FAQs)

Here are answers to some common questions:

  • Can I use fresh spinach instead of frozen? Yes, just blanch and chop fresh spinach before using.
  • Can I make these in a regular-sized muffin tin? Absolutely! Just adjust the baking time, as they will need longer to cook.
  • What should I serve with these Spinach Ricotta Bites? They pair wonderfully with marinara sauce, a fresh salad, or as part of a larger appetizer spread.
  • Are these good for meal prep? Yes, they are perfect for meal prep and can be made in advance for quick snacks.
  • Can I substitute the cheeses? Yes, feel free to use your favorite cheeses or whatever you have on hand.
  • How long do leftovers last? Store leftovers in the fridge for up to 4 days.
  • Can I add meat to these bites? Yes! Cooked bacon or sausage can be added for extra flavor.
  • What’s the best way to reheat them? Reheat in the oven for the best texture, or microwave if you’re short on time.

Nutritional Benefits of Spinach Ricotta Bites

These little bites not only satisfy your taste buds but also offer nutritional perks:

  • Protein-Rich: With ricotta and eggs, these bites provide a good source of protein, essential for muscle repair and growth.
  • Vitamins and Minerals: Spinach is loaded with vitamins A, C, and K, along with iron and calcium.
  • Low in Carbs: A great option for those following low-carb diets, making them a guilt-free snack.

Equipment Recommendations

For best results, consider these kitchen tools:

  • Mini Muffin Tin: Essential for perfectly sized bites.
  • Mixing Bowls: Having various sizes helps when combining ingredients.
  • Silicone Spatula: Great for mixing and scraping down the sides of bowls.
  • Skillet: A non-stick skillet works best for sautéing onions and garlic without sticking.

Serving Suggestions

These bites can be enjoyed in various ways:

  • As an Appetizer: Serve warm with a side of marinara for dipping.
  • In a Salad: Crumble over a fresh salad for added flavor and texture.
  • As a Snack: Enjoy them cold or reheated for a quick, nutritious snack.
  • At a Picnic: Pack them for a delightful addition to your picnic basket.

With their delightful flavor and ease of preparation, these spinach ricotta bites are sure to become a go-to recipe in your kitchen. Whether you’re hosting a gathering or simply enjoying a quiet evening at home, these bites offer a taste of comfort and joy in every bite. Happy cooking!

Spinach Ricotta Bites: The Perfect Easy Appetizer for Every Occasion

Prep Time 10 minutes
Cook Time 20 minutes
Total Time 30 minutes
Servings 12 pieces
Calories 150
These savory spinach ricotta bites are quick to make and perfect for any gathering. They combine cheesy goodness with healthy spinach in a delightful mini muffin form.

Ingredients

Dairy

  • 2 tablespoons butter
  • 1 small yellow onion, chopped
  • 1 clove garlic, minced
  • 2 large eggs, beaten
  • 1 cup ricotta cheese ((low or full-fat))
  • 1/2 cup mozzarella cheese, shredded
  • 1/2 cup parmesan cheese, grated
  • 10 ounces frozen chopped spinach, defrosted and drained (squeeze out excess liquid)
  • 1/4 teaspoon kosher salt

Instructions 

  • Preheat oven to 375°F (190°C) and prepare a mini muffin tin.
  • Sauté onion in butter until soft, then add garlic and cool.
  • Mix eggs, ricotta, cheeses, spinach, onion, garlic, and salt in a bowl.
  • Fill muffin cups with the mixture and bake for 20-25 minutes until golden.
  • Cool briefly, then serve warm or at room temperature.

Notes

For extra flavor, sprinkle with additional Parmesan before baking.
Calories: 150kcal
Cost: $15
Course: Appetizer
Keyword: Cheese, Ricotta, Spinach