

Wrap Yourself in Flavor: A Delightful Crispy Chicken Caesar Wrap Recipe
Welcome to a culinary journey that embraces the simplicity and joy of cooking at home. Today, we’re diving into one of my favorite comfort foods: the Crispy Grilled Chicken Caesar Wrap. This dish is not only a quick and satisfying meal but also a delightful way to enjoy fresh ingredients while treating yourself to a classic recipe reimagined. If you’re looking to impress at lunch or enjoy a cozy dinner, this wrap is the perfect choice.
In this article, you will discover everything you need to create these delicious wraps, from a comprehensive list of ingredients to expert tips for perfecting your technique. Let’s get started!
Why You’ll Love This Recipe
- Quick Preparation: This recipe comes together in under 30 minutes, making it ideal for busy weeknights or spontaneous lunch cravings.
- Simple Ingredients: You likely have most ingredients on hand, minimizing the need for a special grocery run.
- Customizable Flavors: Feel free to adapt the recipe with your favorite add-ins, whether it’s crispy bacon, cherry tomatoes, or even a sprinkle of fresh herbs.
- Perfect for Leftovers: These wraps hold up well in the fridge, making them great for meal prep or as a quick snack the next day.
- Health-Conscious Option: With the option to substitute mayonnaise with Greek yogurt, you can enjoy a lighter version without sacrificing flavor.
Ingredients You’ll Need
Here’s what you’ll need to create these delightful wraps. Each ingredient plays a vital role in achieving that perfect balance of flavors and textures.
- 2 boneless, skinless chicken breasts (about 1 lb / 450 g), pounded to even thickness
- 2 tablespoons olive oil
- 1 teaspoon garlic powder
- 1 teaspoon smoked paprika
- Salt and freshly cracked black pepper, to taste
- ½ cup mayonnaise (or Greek yogurt for a lighter option)
- 2 tablespoons grated Parmesan cheese
- 1 tablespoon fresh lemon juice
- 1 teaspoon Dijon mustard
- 1 small garlic clove, minced
- Salt and pepper, to taste
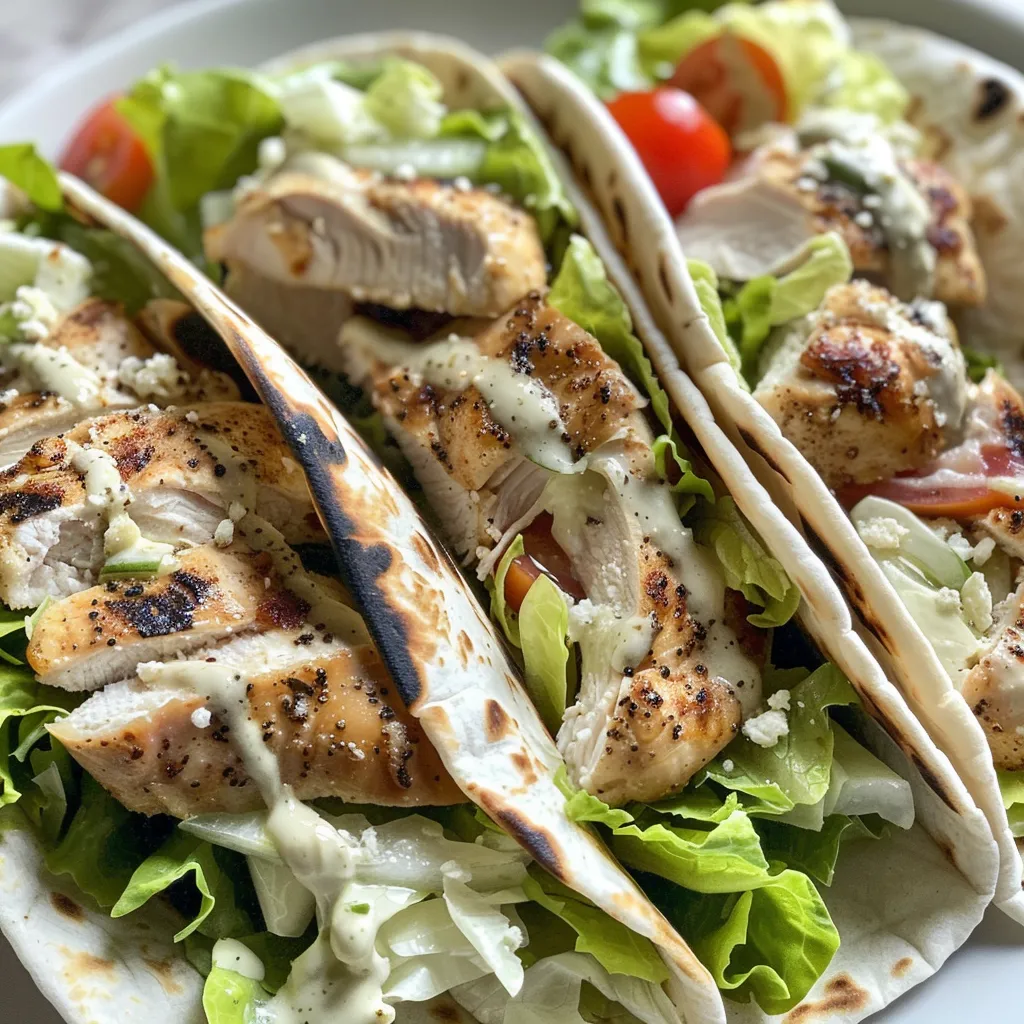
- 4 large flour tortillas (10-inch / 25 cm), warmed
- 2 cups fresh romaine lettuce, chopped
- ½ cup shredded Parmesan cheese
- Optional: sliced cherry tomatoes or cucumbers for extra crunch
Preparation Method
Follow these steps for a seamless cooking experience:
- Pat the chicken breasts dry and pound to an even thickness of about ½ inch (1.3 cm). Brush both sides with olive oil and season evenly with garlic powder, smoked paprika, salt, and pepper.
- Preheat your grill pan or outdoor grill over medium-high heat until smoking hot, around 5 minutes.
- Grill the chicken breasts for 5-6 minutes per side (12-15 minutes total) until grill marks form and the internal temperature reaches 165°F (74°C).
- Transfer the chicken to a plate and let it rest for about 5 minutes before slicing.
- In a bowl, whisk together mayonnaise, Parmesan, lemon juice, Dijon mustard, minced garlic, salt, and pepper until smooth and creamy. Adjust the seasoning to your liking.
- Wash and dry the romaine lettuce thoroughly, then chop it into bite-sized pieces.
- Slice the rested chicken into thin strips or bite-sized pieces.
- Lay the warm tortillas flat and spread a generous spoonful of Caesar dressing down the center of each.
- Top with chopped romaine, sliced chicken, shredded Parmesan, and optional veggies like cherry tomatoes or cucumbers.
- Fold the sides of the tortilla in and roll tightly from the bottom up. Slice diagonally and serve immediately.
- Optional: Toast the wrap in a dry skillet for 1-2 minutes per side for extra crispness.
Pro Tips for Making the Perfect Wraps
- Even Thickness: Ensure your chicken is pounded to an even thickness for uniform cooking and tenderness.
- Rest the Chicken: Letting the chicken rest after grilling helps retain its juices, making the meat more flavorful.
- Chill the Wraps: If possible, let the assembled wraps chill in the fridge for 10-15 minutes before slicing to firm them up.
- Experiment with Dressings: Try different dressings or add-ins to customize the flavor profile to your taste.
- Use Fresh Ingredients: Fresh romaine and high-quality chicken make a noticeable difference in flavor and texture.
- Wrap Carefully: Don’t overfill your wraps to prevent spills; a little goes a long way!
- Storage Tip: Store leftovers in an airtight container for up to 2 days for optimal freshness.
- Garnish with Greens: Fresh herbs like parsley or basil can elevate your wrap with additional flavor.
Common Mistakes and Troubleshooting
Even experienced cooks can encounter hiccups in the kitchen. Here are some common mistakes to avoid:
- Soggy Wraps: Ensure the chicken is cooled before assembling to prevent the tortillas from getting soggy.
- Overcooked Chicken: Use a meat thermometer to check for doneness; overcooked chicken can be dry and tough.
- Too Much Dressing: A little dressing goes a long way. Start with less and add more to taste to avoid overwhelming the other flavors.
- Unbalanced Flavors: Taste and adjust seasoning as needed; the right balance is key to a delicious wrap.
Delicious Variations to Try
Feeling adventurous? Here are some variations to inspire your next wrap:
- Buffalo Chicken Caesar Wrap: Add buffalo sauce to the grilled chicken for a spicy twist.
- Vegetarian Caesar Wrap: Substitute chicken with grilled vegetables or chickpeas for a plant-based option.
- Greek Caesar Wrap: Incorporate feta cheese, olives, and fresh herbs for a Mediterranean flair.
- BBQ Chicken Caesar Wrap: Use BBQ sauce instead of Caesar dressing for a smoky, sweet flavor.
Storage and Make-Ahead Instructions
Planning to make your wraps ahead of time? Here’s how to do it right:
- Make-Ahead: Prep the chicken and dressing in advance. Store in separate containers until ready to assemble.
- Refrigerate: Assembled wraps can be stored in the refrigerator for up to 2 days, wrapped tightly in plastic wrap or in an airtight container.
- Freezing: While wraps are best fresh, you can freeze the grilled chicken separately for later use. Thaw in the refrigerator before assembling.
Frequently Asked Questions
Here are some common questions about making Crispy Grilled Chicken Caesar Wraps:
- Can I use a different type of protein? Absolutely! Feel free to substitute with turkey, tofu, or even tempeh.
- How do I keep my wraps from getting soggy? Allow the chicken to cool and dry the vegetables thoroughly before assembly.
- What can I serve with these wraps? Pair them with a side salad, sweet potato fries, or a refreshing fruit salad.
- Can I make the dressing ahead of time? Yes, the dressing can be made up to 3 days in advance and stored in the fridge.
- Is this recipe gluten-free? You can make it gluten-free by using gluten-free tortillas.
- How do I know when the chicken is done? Use a meat thermometer to ensure the chicken reaches an internal temperature of 165°F (74°C).
- What if I don’t have a grill? You can cook the chicken in a skillet or bake it at 400°F (200°C) for about 20 minutes.
- Can I add more vegetables? Absolutely! Feel free to include bell peppers, spinach, or any of your favorite veggies for added nutrition.
Nutritional Tips and Dietary Adaptations
This recipe is not only delicious but can also be tailored to fit various dietary needs:
- Low-Carb Option: Use lettuce leaves instead of tortillas for a lighter, low-carb version.
- High-Protein: Increase the protein by adding more chicken or incorporating beans into the filling.
- Dairy-Free: Substitute the dressing with a dairy-free alternative or a simple vinaigrette.
- Whole Grain: Use whole grain or spinach tortillas for added fiber and nutrients.
Essential Equipment Recommendations
To make your cooking experience seamless, consider having these tools on hand:
- Grill Pan: Ideal for achieving those beautiful grill marks and smoky flavor.
- Meat Thermometer: Ensures your chicken is cooked perfectly every time.
- Mixing Bowls: For easy preparation of the dressing and ingredient mixing.
- Sharp Knife: A good knife will make slicing the chicken and wrapping your ingredients effortless.
Serving Suggestions
Enhance your dining experience with these serving ideas:
- Garnish: A sprinkle of freshly chopped herbs or additional grated Parmesan can add a lovely finishing touch.
- Side Dishes: Serve with a side of crispy sweet potato fries or a light salad for a complete meal.
- Dip: Pair with extra Caesar dressing or a homemade ranch dip for an added flavor boost.
In conclusion, these Crispy Grilled Chicken Caesar Wraps are not just a recipe; they are an invitation to enjoy the art of cooking in your own kitchen. With their delightful flavors and easy preparation, you’ll find joy in every bite. So gather your ingredients, put on your apron, and embrace the comforting process of creating a meal that nourishes both body and soul. Happy cooking!
Crispy Grilled Chicken Caesar Wraps
Ingredients
Chicken
- 2 pieces boneless, skinless chicken breasts (about 1 lb / 450 g, pounded to even thickness)
- 2 tablespoons olive oil
- 1 teaspoon garlic powder
- 1 teaspoon smoked paprika
- Salt and freshly cracked black pepper to taste Salt and pepper
- ½ cup mayonnaise (or Greek yogurt for a lighter option)
- 2 tablespoons grated Parmesan cheese
- 1 tablespoon fresh lemon juice
- 1 teaspoon Dijon mustard
- 1 small garlic clove (minced)
- 4 large flour tortillas (10-inch / 25 cm, warmed)
- 2 cups fresh romaine lettuce (chopped)
- ½ cup shredded Parmesan cheese
Optional veggies
- sliced cherry tomatoes or cucumbers optional sliced cherry tomatoes or cucumbers (for extra crunch)
Instructions
- Pound chicken to even thickness, brush with olive oil, and season with garlic powder, paprika, salt, and pepper.
- Grill chicken over medium-high heat for 5-6 minutes per side until cooked through. Rest for 5 minutes, then slice.
- Mix mayonnaise, Parmesan, lemon juice, Dijon, minced garlic, salt, and pepper to make Caesar dressing.
- Spread dressing on warm tortillas, add lettuce, sliced chicken, Parmesan, and optional veggies. Roll up tightly and slice diagonally.
- Optional: Toast wraps in a skillet for 1-2 minutes per side for extra crispness.