
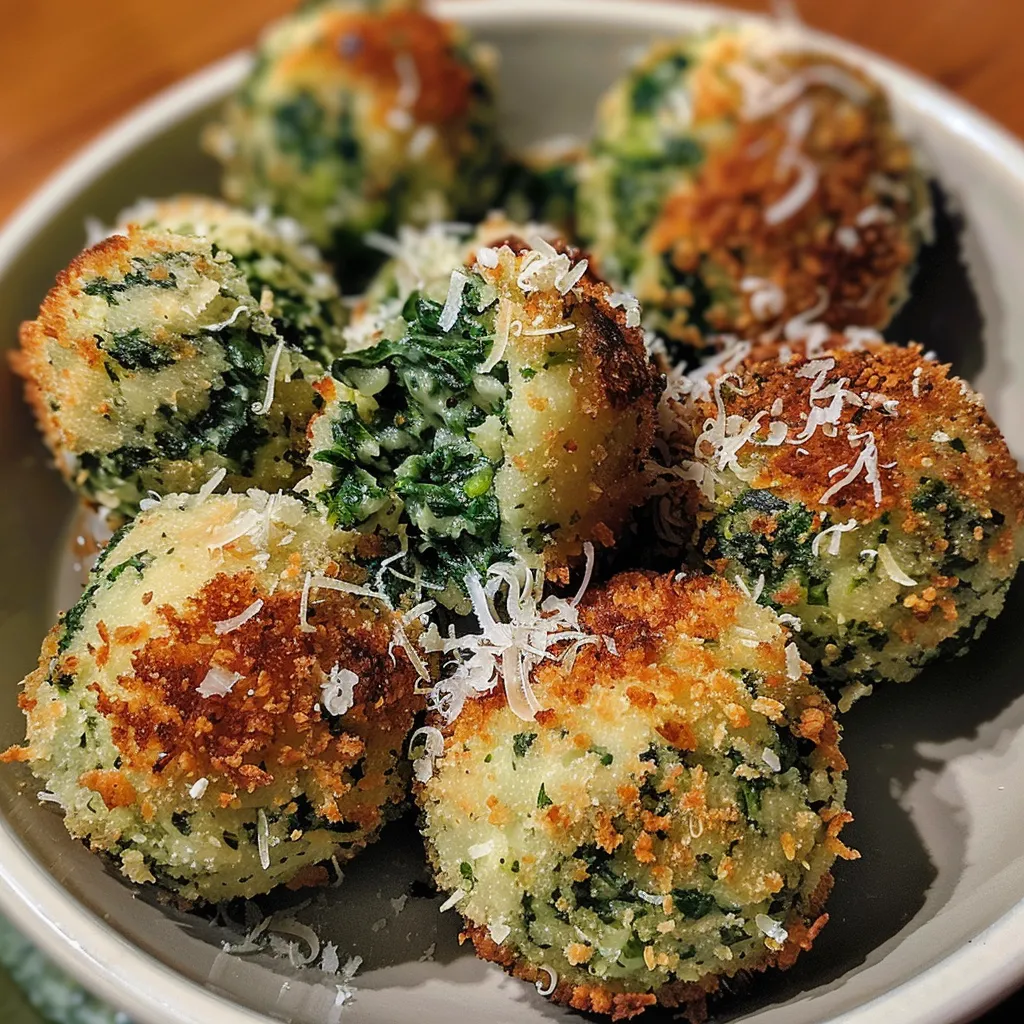
Experience the Comfort of Nourishing Spinach Balls
Cooking is not just about feeding the body; it’s about nourishing the soul. Today, I’m excited to share a delightful recipe that embodies this philosophy—**Nourishing Spinach Balls**. These little bites are a perfect balance of flavor and nutrition, making them a wonderful addition to any meal. Whether you’re hosting a gathering or simply looking for a comforting side dish, these spinach balls are sure to impress.
In this comprehensive guide, we’ll explore every aspect of making these delicious morsels, from selecting the right ingredients to serving suggestions. By the end, you’ll have the confidence and knowledge to create these spinach balls with ease and joy. Let’s get cooking!
Why You’ll Love This Recipe
There are countless reasons to adore spinach balls, but here are just a few that stand out:
- Versatile Delight: Perfect as an appetizer, side dish, or even a light main course paired with a salad.
- Quick and Easy: With just a handful of ingredients and minimal prep time, you can whip these up in no time.
- Make-Ahead Friendly: Prepare them in advance and freeze for a convenient option on busy days.
- Nutrient-Rich: Packed with vitamins and protein, these spinach balls are a wholesome addition to your meals.
- Customizable: Easily adapt the recipe to fit your dietary preferences with various substitutions.
The Perfect Ingredient Breakdown
This recipe calls for simple yet flavorful ingredients. Let’s take a closer look at what you’ll need and some potential substitutions.
- 1 stick butter: Adds richness and flavor. You can substitute with olive oil for a healthier option.
- 1 onion, chopped: Provides aromatic flavor. Shallots or leeks can be used for a different taste.
- 2 boxes frozen chopped spinach: The star of the show! Fresh spinach can also work; just be sure to cook it down and drain excess moisture.
- Italian seasoning: A blend of herbs that enhances flavor. Feel free to adjust or use your favorite herbs.
- Garlic powder: For that savory depth. Fresh minced garlic can be used for a more robust flavor.
- 2 eggs, beaten: Binds the mixture together. For a vegan option, use flax eggs or applesauce.
- Parmesan cheese: Adds a savory note. Nutritional yeast is a great dairy-free alternative.
Step-by-Step Guide to Making Spinach Balls
Now that we have our ingredients ready, let’s dive into the preparation process.
- Step 1: Prepare Ingredients
Start by gathering all your ingredients. If you’re using fresh spinach, wash and chop it finely. For frozen spinach, ensure it’s thawed and well-drained to prevent sogginess. - Step 2: Cook and Drain the Spinach
In a large skillet over medium heat, melt the butter and sauté the chopped onion until translucent. Add the spinach and cook for about 5-7 minutes, allowing excess moisture to evaporate. Remove from heat. - Step 3: Combine Ingredients
In a large mixing bowl, combine the cooked spinach mixture with the beaten eggs, breadcrumbs, Italian seasoning, garlic powder, and Parmesan cheese. Mix until well combined. - Step 4: Shape the Spinach Balls
Preheat your oven to 375°F (190°C). Using your hands, form the mixture into small balls, about the size of a golf ball. Arrange them on a baking sheet lined with parchment paper. - Step 5: Bake
Bake the spinach balls for 20-25 minutes, or until golden brown. Let them cool slightly before serving.
Pro Tips for Perfect Spinach Balls
To ensure your spinach balls turn out perfectly, consider these expert tips:
- Drain Well: Make sure to squeeze out as much moisture from the spinach as possible to avoid soggy balls.
- Mix Thoroughly: Ensure all ingredients are well combined for even flavor distribution.
- Experiment with Seasoning: Adjust the seasonings according to your taste. Adding a pinch of red pepper flakes can give a delightful kick!
- Uniform Size: Try to make the spinach balls uniform in size for even baking.
- Cooling Time: Allow them to cool slightly before serving; this helps them firm up.
- Freezing: You can freeze uncooked spinach balls on a baking sheet and transfer them to a freezer bag once frozen. Bake directly from the freezer, adding a few extra minutes to the cooking time.
- Serving Sauce: Pair with a tangy dipping sauce like tzatziki or marinara for added flavor.
Common Mistakes and Troubleshooting
Even the best cooks encounter challenges. Here are some common mistakes to avoid:
- Too Much Moisture: If the mixture is too wet, your spinach balls may fall apart. Always drain spinach thoroughly.
- Overcrowding the Baking Sheet: Give each spinach ball enough space to cook evenly. Use two baking sheets if necessary.
- Underseasoning: Don’t skimp on the spices; they bring the flavor to life.
Delicious Variations to Try
Feeling adventurous? Here are some variations to put a twist on the classic spinach balls:
- Cheesy Spinach Balls: Mix in additional cheese like feta or mozzarella for a gooey center.
- Spicy Spinach Balls: Add diced jalapeños or red pepper flakes for extra heat.
- Herb-Infused: Incorporate fresh herbs like dill or parsley for a fragrant touch.
- Nutty Crunch: Add chopped walnuts or pine nuts for a satisfying crunch.
Storage and Make-Ahead Instructions
These spinach balls can be prepared ahead of time and stored in various ways:
- Refrigerator: Store in an airtight container for up to 3 days.
- Freezer: Freeze uncooked spinach balls for up to 3 months. Just bake from frozen when ready to serve.
- Reheating: Reheat baked spinach balls in the oven at 350°F (175°C) for about 10 minutes or until heated through.
Frequently Asked Questions
Here are some common questions about spinach balls:
- Can I use fresh spinach instead of frozen?
Yes, fresh spinach can be used, but ensure it is cooked and well-drained. - What can I serve with spinach balls?
They pair well with marinara sauce, yogurt dips, or a fresh green salad. - Can I make these spinach balls vegan?
Yes! Substitute eggs with flax eggs or unsweetened applesauce. - What’s the best way to store leftovers?
Keep them in an airtight container in the refrigerator for up to 3 days. - How do I reheat spinach balls?
Reheat in the oven or air fryer to restore their crispness. - Can I freeze cooked spinach balls?
Yes, you can freeze them for up to 3 months, making them a great meal prep option. - How do I know when spinach balls are done?
They should be golden brown and firm to the touch. - What if my mixture is too dry?
Add a bit more beaten egg or a splash of water to moisten.
Nutritional Tips and Dietary Adaptations
Spinach balls are not only tasty but also nutritious. Here are some tips to enhance their health benefits:
- Boost the Greens: Add kale or Swiss chard to the spinach for an additional nutrient boost.
- Whole Grain Options: Use whole grain breadcrumbs for added fiber and nutrients.
- Low-Fat Variants: Substitute butter with Greek yogurt for a lower fat content without compromising taste.
Essential Equipment Recommendations
To make your cooking experience smoother, here are some recommended tools:
- Baking Sheet: A sturdy baking sheet is essential for even cooking.
- Parchment Paper: For easy cleanup and to prevent sticking.
- Mixing Bowls: A set of mixing bowls will make combining ingredients a breeze.
- Measuring Cups and Spoons: Accurate measurements ensure consistency in your recipe.
Enjoying Your Spinach Balls
These nourishing spinach balls are more than just a recipe; they are an invitation to slow down and savor the process of cooking. They can be enjoyed in various ways, whether as a snack, appetizer, or part of a comforting meal. I encourage you to experiment with flavors and make this recipe your own. Happy cooking!
Delicious Spinach Balls
Ingredients
Dairy
- 1 stick butter
- 1 piece onion, chopped
Frozen Spinach
- 2 boxes frozen chopped spinach
Spices & Seasonings
- Italian seasoning
- Garlic powder
Eggs
- 2 pieces eggs, beaten
Cheese
- Parmesan cheese
Instructions
- Preheat oven to 375°F (190°C).
- In a skillet, melt butter and sauté chopped onion until translucent.
- Mix cooked onion, spinach, eggs, Parmesan, and seasonings in a bowl.
- Form mixture into small balls and place on a baking sheet.
- Bake for 20 minutes until golden brown.